Bu Yazımızda Neler Var :
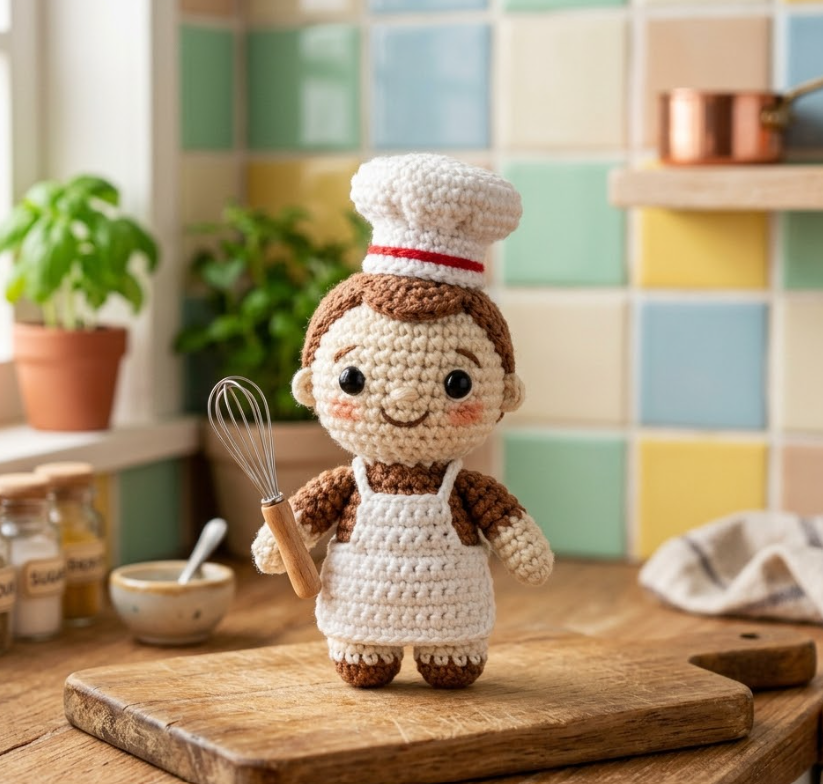
Adorable Amigurumi Chef: Free Crochet Pattern for a Tiny Kitchen Friend
Looking for a fun beginner-friendly amigurumi pattern? This free crochet chef doll tutorial walks you through every step — from the chef hat to the mini whisk — making it the perfect project for kitchen-themed gifts, nursery decor, or your handmade shop. Keywords: amigurumi chef pattern, free crochet chef doll, crochet kitchen amigurumi, amigurumi pattern for beginners.
Welcome to Inspire & Create! 🧶
Hi there, wonderful maker! We’re so glad to have you back for another fun project. Today’s creation is full of personality — a tiny crochet chef ready to whip up something delicious in your amigurumi kitchen. Grab your hook and let’s get cooking (with yarn, of course)!
How to Crochet an Amigurumi Chef Doll: Step-by-Step Pattern
What You’ll Need
Materials
- Skin-tone yarn (face, hands)
- White yarn (chef hat, apron, jacket)
- Black or dark gray yarn (pants, shoes)
- Small amount of red or checkered-pattern yarn (optional apron accent)
- 3.5mm crochet hook
- Polyester fiberfill stuffing
- Safety eyes
- Yarn needle
- Black embroidery thread (for facial details)
- Tiny stick or wooden dowel (for the mini whisk prop)
Skill level: Intermediate (great practice for color changes and small accessory shaping)
Finished size: Approximately 5-6 inches tall
Step 1: Crochet the Head (Skin-Tone Yarn)
- Round 1: 6 sc in magic ring (6)
- Round 2: inc in each st (12)
- Round 3: sc, inc repeat (18)
- Round 4: sc 2, inc repeat (24)
- Round 5: sc 3, inc repeat (30)
- Rounds 6-10: sc around (30) — 5 rounds even
- Insert safety eyes around round 7, spaced 7-8 sts apart
- Round 11: sc 3, dec repeat (24)
- Round 12: sc 2, dec repeat (18)
- Stuff firmly
- Round 13: sc, dec repeat (12)
- Round 14: dec around (6)
- Fasten off, close hole
Step 2: Make the Chef Hat (White Yarn)
- Round 1: 6 sc in magic ring (6)
- Round 2: inc around (12)
- Round 3: sc, inc repeat (18)
- Round 4: sc 2, inc repeat (24)
- Rounds 5-9: sc around (24) — 5 rounds (this forms the tall poofy top)
- Round 10: sc 2, inc repeat (32) — slight flare for the band
- Round 11: sc around (32)
- Fasten off, sew onto top of head
Step 3: Crochet the Body / Chef Jacket (White Yarn)
- Round 1: 6 sc in magic ring (6)
- Round 2: inc around (12)
- Round 3: sc, inc repeat (18)
- Round 4: sc 2, inc repeat (24)
- Rounds 5-11: sc around (24) — 7 rounds even
- Round 12: sc 2, dec repeat (18)
- Stuff firmly
- Round 13: sc, dec repeat (12)
- Round 14: dec around (6)
- Fasten off, close hole, sew to head
Add buttons: Embroider 3 small French knots down the front center of the jacket for a classic chef coat look.
Step 4: Crochet the Arms (Skin-Tone + White Sleeve, Make 2)
- Round 1: 6 sc in magic ring (6)
- Rounds 2-3: sc around (6) — 2 rounds (skin-tone, this is the hand)
- Switch to white:
- Rounds 4-8: sc around (6) — 5 rounds (sleeve)
- Stuff lightly, flatten and sc closed
- Sew to sides of body
Step 5: Crochet the Legs and Pants (Black Yarn, Make 2)
- Round 1: 6 sc in magic ring (6)
- Round 2: inc around (12)
- Rounds 3-7: sc around (12) — 5 rounds
- Stuff firmly, flatten and sc closed
- Sew to bottom of body
Step 6: Make the Shoes (Black or Dark Gray Yarn, Make 2)
- Round 1: 6 sc in magic ring (6)
- Round 2: inc around (12)
- Rounds 3-4: sc around (12)
- Flatten into oval, sc closed
- Sew to bottom of each leg
Step 7: Crochet the Apron (White Yarn with Optional Accent)
- Ch 2, work a rectangle in rows of sc: start with about 8 sc across, work even for 6-7 rows
- Optional: add a contrasting border of single crochet around the edges in red or checkered yarn
- Add two thin chains as straps, crossing over the shoulders and tying at the back
- Sew or tie around the chef’s waist and chest
Step 8: Make the Mini Whisk Prop
- Take a small wooden dowel, toothpick, or piece of stiff wire (about 1.5-2 inches long) as the handle
- Wrap the top portion with silver/gray embroidery thread or thin wire, looping it into a small whisk-bulb shape (3-4 loops bent outward from the handle)
- Secure with a dab of glue at the base
- Place into one of the chef’s hands, shaping the hand slightly if needed to hold the prop in place
Step 9: Finishing Touches
- Embroider a small smile and rosy cheeks with embroidery thread
- Weave in all loose ends
- Adjust the chef hat angle slightly for a playful, lifelike look
Tips for the Perfect Amigurumi Chef
- Use a smaller hook size than recommended on the yarn label for tighter stitches — this keeps stuffing from showing through
- If making this as a gift, consider personalizing the apron color to match the recipient’s kitchen theme
- This pattern is easily adaptable into a baker, pastry chef, or barista by swapping the hat and adding props like a tiny rolling pin or coffee cup
Thank you so much for cooking up this little chef with us today! We hope this charming amigurumi character brings a smile to your kitchen shelf or makes the perfect handmade gift for the foodie in your life. For more free crochet patterns and creative inspiration, visit us at Inspire & Create | Bringing Imagination to Life. Happy hooking, and we’ll see you in the next tutorial! 👨🍳🧶