Crochet Hook4.5 mm hook
Yarn Weight(4) Medium Weight/Worsted Weight and Aran (16-20 stitches to 4 inches)
MATERIALS
- Bernat® Super Value™ (197 g/7 oz; 389 m/426 yds)
Contrast A Redwood Heather (53522) 1 ball
Contrast B Natural (07414) 1 ball
Contrast C Black (07421) 1 ball - Size 5 mm (U.S. H/8) crochet hook or size needed to obtain gauge.
- 1¼” [3 cm] button with shank (to be covered for ‘nose’).
GAUGE
13 sc and 14 rows = 4″ [10 cm].
INSTRUCTIONS
FRONT
Top of Head and Snout
Snout: Beg at base of Snout, with A, ch 4.
1st row: (RS). 1 sc in 2nd ch from hook. 1 sc in each of next 2 ch. Turn. 3 sc.
2nd to 4th rows: Ch 1. 1 sc in each sc to end of row. Turn.
5th row: Ch 1. 2 sc in first sc. 1 sc in each sc to last sc. 2 sc in last sc. Turn. 5 sc.
6th to 9th rows: As 2nd row.
10th row: As 5th row. 7 sc.
11th and 12th rows: As 2nd row.
13th row: As 5th row. 9 sc.
14th to 16th rows: As 2nd row.
17th row: As 5th row. 11 sc.
18th to 20th rows: As 2nd row.
21st to 24th rows: As 5th row. 19 sc at end of 24th row. Fasten off and set aside to be joined to Sides later.
Right Side of Head
With A, ch 6.
1st row: (RS). 1 sc in 2nd ch from hook. 1 sc in each of next 4 ch. Turn. 5 sc.
2nd row: Ch 3. 1 sc in 2nd ch from hook. 1 sc in next ch. 1 sc in each of next 5 sc. Turn. 7 sc.
3rd row: Ch 1. 1 sc in each sc to last sc. 2 sc in last sc. 8 sc. Fasten off.
Left Side of Head
Work as for Right side of Head, noting RS and WS are reversed. Do not fasten off.
Join Sides of Head to Snout:
1st row: (RS). Ch 1. 1 sc in each of next 8 sc of Left side of Head. Ch 8. Work 1 sc in each of next 19 sc of Snout. Ch 8. Work 1 sc in each of next 8 sc of Right side of Head. Turn.
2nd row: Ch 1. 1 sc in each of first 8 sc. 1 sc in each of next 8 ch. 1 sc in each of next 19 sc. 1 sc in each of next 8 ch. 1 sc in each of last 8 sc. Turn. 51 sc. Place markers at each end of row.
3rd to 6th rows: Ch 1. Sc2tog. 1 sc in each sc to last 2 sc. Sc2tog. Turn. 43 sts at end of 6th row.
7th row: Sl st in each of first 2 sc. Ch 1. 1 sc in each sc to last 2 sc. Turn. Leave rem sts unworked.
8th to 13th rows: As 7th row. 15 sts rem at end of 13th row. Fasten off.
Edging: With RS facing, join A with sl st at corner of Left Side of Head at side edge. Ch 1. Work sc evenly around outer edge of Top of Head and Snout, working 2 sc in corners. Join with sl st to first sc. Fasten off.
Lower Section of Front
Beg at lower edge, with B, ch 30.
**1st row: (RS). 1 sc in 2nd ch from hook. 1 sc in each ch to end of chain. Turn. 29 sc.
2nd to 9th rows: Ch 1. 2 sc in first sc. 1 sc in each sc to last sc. 2 sc in last sc. Turn. 45 sc at end of 9th row.
10th row: Ch 1. 1 sc in each sc to end of row. Turn.
11th row: Ch 1. 2 sc in first sc. 1 sc in each sc to last sc. 2 sc in last sc. Turn.
12th to 15th rows: As 10th and 11th rows twice more. 51 sc at end of 15th row.
16th to 32nd rows: Ch 1. 1 sc in each sc to end of row. Turn.** Place markers at each end of last row.
33rd to 35th rows: Ch 1. Sc2tog. 1 sc in each sc to last 2 sc. Sc2tog. Turn. 45 sts rem at end of 35th row.
Do not fasten off.
Cont as follows for edging: Ch 1. Work sc evenly down side of piece, across foundation ch and up opposite side. Fasten off.
BACK
Beg at lower edge, with A, ch 30.
Work from ** to ** as given for Lower Section of Face.
33rd to 36th rows: Ch 1. Sc2tog. 1 sc in each sc to last 2 sc. Sc2tog. Turn. 43 sts rem at end of 36th row.
37th row: Sl st in each of first 2 sc. Ch 1. 1 sc in each sc to last 2 sc. Turn. Leave rem sts unworked.
38th to 43rd rows: As 37th row. 15 sts rem at end of 43rd row. Do not fasten off.
Cont as follows for edging: Ch 1. Work sc evenly around outer edge, working 2 sc in corners. Join with sl st to first sc. Fasten off.
Front Ear (make 2):
With C, ch 6.
1st row: (RS). 1 sc in 2nd ch from hook. 1 sc in each ch to end of chain. Turn. 5 sc.
2nd and 3rd rows: Ch 1. 1 sc in each sc to end of row. Turn.
4th row: Ch 1. Sc2tog. 1 sc in next sc. Sc2tog. Turn. 3 sts.
5th row: Ch 1. 1 sc in each st to end of row. Turn.
6th row: Ch 1. Sc3tog. Fasten off.
Edging: (RS). Join A with sl st at lower corner. Ch 1. Work 6 sc up side edge, 3 sc in point and 6 sc down opposite side edge. Fasten off.
Back Ear (make 2): With A only, work as given for Front Ear (including edging).
Join Front and Back Ears: Place WS of Front and Back Ears tog. With RS of Front Ear facing, join A with sl st through both thicknesses in first sc of edging. Ch 1. Work 1 sc in each sc up side, 3 sc in point and 1 sc in each sc down opposite side. Working through both thicknesses, sl st
across lower edge, then work 1 more row of sc up side, 3 sc in point and down opposite side to lower edge. Fasten off.
Eyes (make 2)
**With C, ch 2.
1st rnd: 6 sc in 2nd ch from hook. Join with sl st to first sc.
2nd rnd: Ch 1. 2 sc in same sp as last sl st. 2 sc in each sc around. Join with sl st to first sc. 12 sc.**
3rd rnd: Ch 1. 1 sc in same sp as last sl st. (2 sc in next sc. 1 sc in next sc) 4 times. Sl st in next sc. Fasten off. Leave rem sts unworked.
Nose Button Cover
Work from ** to ** as given for Eyes.
3rd rnd: Ch 1. 1 sc in same sp as last sl st. *2 sc in next sc. 1 sc in next sc. Rep from * to last sc. 2 sc in last sc. Join with sl st to first sc. 18 sc.
4th rnd: Ch 1. 1 sc in same sp as last sl st. 1 sc in each sc around. Join with sl st to first sc.
5th rnd: Ch 1. 1 sc in same sp as last sl st. *Sc2tog. 1 sc in next sc. Rep from * to last 2 sc. Sc2tog. Join with sl st to first sc. 12 sts.
6th rnd: As 4th rnd. Fasten off.
Place button inside button cover. Stitch around cover opening, leaving shank free to attach to Pillow.
FINISHING
With RS of pieces facing, place Lower Section of Front Face under Top of Head and Snout, matching marked rows. Pin overlapping sections on each side to secure.
Join Back and Front: Place WS of Back against WS of Front Sections and match outer edges. With RS of Front facing, working through all thicknesses, join A with sl st in corner of Top of Head and Snout at side edge. Ch 1. Work 1 rnd of sc around outer edge. Join with sl st to first sc. Fasten off.
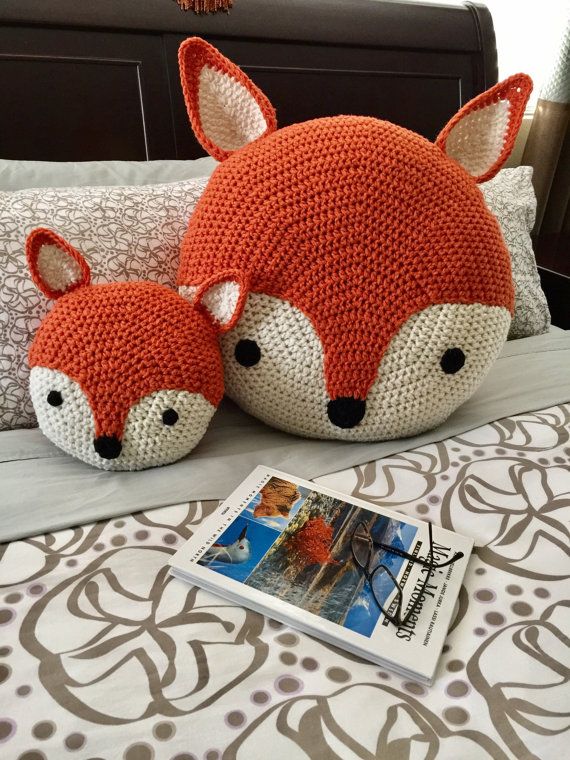
With B, embroider lower section of eyes with satin stitch as shown in picture. Sew Ears and Eyes in position as shown in picture.
Button loop: With RS facing, join A with sl st at side edge at base on ‘Snout’. Ch 9. Join with sl st at opposite side edge. Fasten off.
Mark position for button on Lower Front Section to correspond to button loop. Sew button in position.


