AMIGURUMİ TEAPOT CROCHET PATTERN
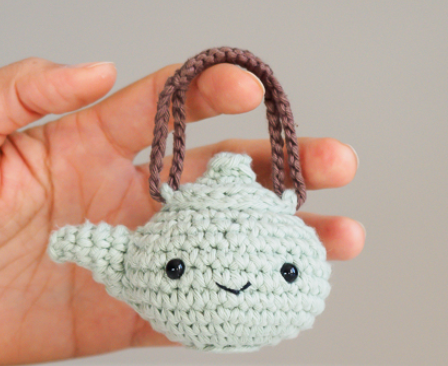
Some people may defer to the European, Beauty and Beast type of teapot, but this little amigurumi teapot is inspired by the distinctive look of the Japanese tetsubin tea kettles. Of course, at this size, a round teapot is any round teapot, but hopefully the unique handle of this amigurumi sets it a bit apart!
This teapot is constructed pretty simply, using crocheted rounds, worked with a seam along the back. (If you need help with amigurumi skills, head over to this Amigurumi Flan tutorial to get started!)
But you don’t close the top of the amigurumi right away. You leave it open so you can create the loops through which the handles will go. Then you work up a separate cap, just like a real kettle that is then sewn onto the body of the kettle using mattress stitch
When the body is done, line up the spout on either side of the face, and sew it to the body. You can add just a tiny bit of stuffing in the spout to help it hold its shape.
Unlike the little teapot song where the handle is on the other side of the spout, the handle floats above the tea kettle and is simply made from chain stitches and macrame square knots.
Bu Yazımızda Neler Var :
Supplies
- MC: Paintbox Cotton Aran in any color or other color for the clear glass
- C1: Paintbox Cotton Aran in Soft Fudge or other color for the base
- F/3.75mm crochet hook
- D/3.25mm crochet hook
- Cluster fiberfill
- 6mm safety eyes
- scissors
- embroidery thread or lightweight yarn in Black
- tapestry needle
Abbreviations
- st(s) – stitch(es)
- sl st – slip stitch
- ch – chain stitch
- sc – single crochet
- hdc – half double crochet
- inc – increase: work 2 sc in same st
- dec – decrease: work 2 sc together
- BLO – back loop only
Pattern Notes
- Rounds in teapot are worked with a seam and joined with a seamless join.
- Eyes are placed approximately 1.0-1.25 inches apart.
- Amigurumi can be closed using this technique.
Amigurumi Teapot Instructions
BODY
- Worked in seamed rounds.
- Worked with MC.
Round 1: Work 6 sc into a magic circle. Join to first sc with sl st. (6)
Round 2: Ch 1. Work 2 sc into each st around. Join to first sc with sl st. (12)
Round 3: Ch 1. Work 1 sc in BLO of each st around. Join to first sc with sl st. (12)
Round 4: Ch 1. Work 2 sc in each st around. Join to first sc with sl st. (24)
Round 5: Ch 1. Work [3 sc, inc] 6x around. Join to first sc with sl st. (30)
Round 6: Ch 1. Work [4 sc, inc] 6x around. Join to first sc with sl st. (36)
Round 7-9: Ch 1. Work 1 sc in each st around. Join to first sc with sl st. (36)
Round 10: Ch 1. Work [4 sc, dec] 6x around. Join to first sc with sl st. (30)
Round 11: Ch 1. Work [3 sc, dec] 6x around. Join to first sc with sl st. (24)
Round 12: Ch 1. Work [2 sc, dec] 6x around. Join to first sc with sl st. (18)
Round 13: Ch 1. Work 1 sl st in each of next 5 sts, ch 3, 1 sl st in each of next 9 sts, ch 3, 1 sl st in each of next 4 sts. Join to first sc with sl st.
Fasten off and weave in ends.
- Add eyes between Rounds 8 and 9.
- Sew mouth between Rounds 7 and 8, centered between the eyes.
SPOUT
- Worked in seamed rounds.
- Worked with MC.
Round 1: Work 6 sc into a magic circle. Join to first sc with sl st. (6)
Round 2: Ch 1. Work 1 sc in BLO of each st around. Join to first sc with sl st. (6)
Round 3: Ch 1. Work 2 sc, 2 inc, 2 sc. Join to first sc with sl st. (8)
Round 4: Ch 1. Work 3 sc, 2 inc, 3 sc. Join to first sc with sl st. (10)
Round 5: Ch 1. Work 4 sc, 2 hdc in each of next 2 sts, 4 sc. Join to first sc with sl st. (12)
- Fasten off with a long tail.
CAP
- Worked in seamed rounds.
- Worked with MC.
Round 1: Work 6 sc into a magic circle. Join to first sc with sl st. (6)
Round 2: Ch 1. Work 1 sc in BLO of each st around. Join to first sc with sl st. (6)
Round 3: Ch 1. Work 2 sc in each st around. Join to first sc with sl st. (12)
Round 4: Ch 1. Work [1 sc, inc] 6x around. Join to first sc with sl st. (18)
- Fasten off with a long tail.ASSEMBLY
Align the seams of the CAP on the BODY and sew the CAP onto the BODY using a mattress stitch, skipping the ch 3 loops.
Stuff the amigurumi before sewing the opening closed. Fasten off and weave in ends.
Sew the SPOUT onto the body, aligned with the ch 3 loops and so that the bottom of the spout lines up just above the eyes. You can stuff the spout lightly.
Use C1 and ch 50, starting and ending with a long tail. Thread an end of the handle through both ch 3 loops and then tie ends together.
Double up on the handle.
Take the beginning and end tails and work macrame square knots around the handle for about an inch.
Fasten off and weave in the two ends.