Bu Yazımızda Neler Var :
Welcome to Inspire & Create! 🧶
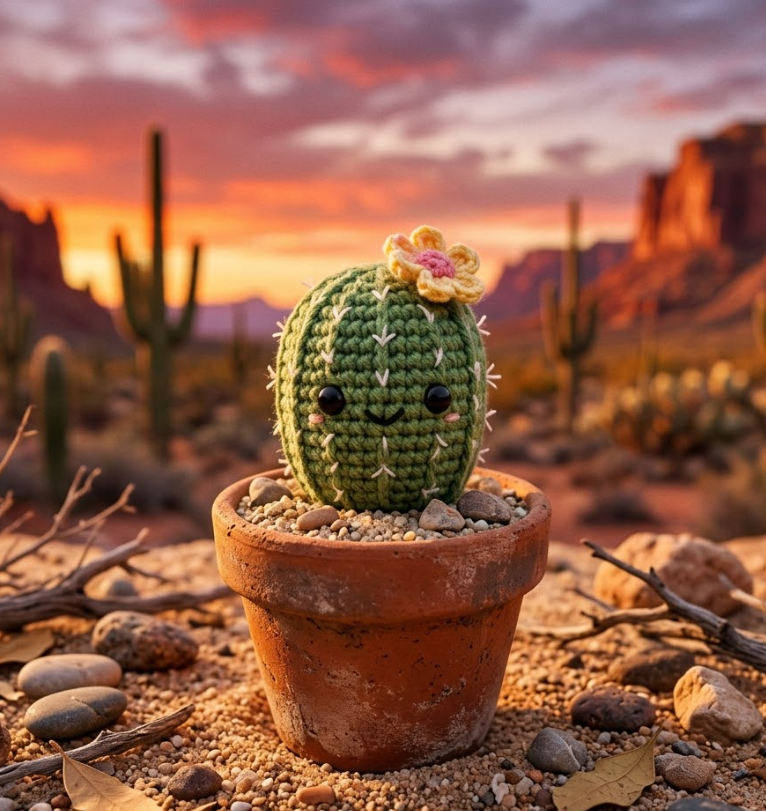
Hello, wonderful maker! We’re so happy you’re here for another creative session. Today’s project brings a little touch of the desert into your home — a sweet, sunny cactus friend that’s perfect for beginners and yarn-stash leftovers alike. Grab your hook, get comfortable, and let’s grow something adorable together!
Amigurumi Cactus in a Pot Tutorial
Materials
- Green yarn (cactus body) — can use two shades of green for a layered look
- Terracotta/orange-brown yarn (pot)
- Cream or beige yarn (pot rim, optional contrast)
- Yellow or pink yarn (small flower on top, optional)
- White yarn (cactus spikes, optional embroidery)
- 3.5mm crochet hook
- Stuffing
- Yarn needle
- Stitch markers
- Small piece of cardboard or plastic canvas (for pot base stability, optional)
Getting Started: Understanding the Shape
Before we dive in, it helps to picture the finished cactus: a rounded, slightly tapered body sitting snugly inside a wider pot, with a small flower or extra “arm” on top for character. We’ll work the pot first since it needs to be sturdy enough to hold the cactus upright, then move on to the cactus body itself.
Pot (terracotta)
The pot is worked as a flat base that increases out, then straight sides that go up without further increasing — this is what gives it that classic flowerpot shape.
- Round 1: 6 sc in magic ring (6)
- Round 2: inc in each st (12)
- Round 3: sc, inc repeat (18)
- Round 4: sc 2, inc repeat (24)
- Round 5: sc 3, inc repeat (30)
- Round 6: sc 4, inc repeat (36)
This gives you a flat circle of 36 stitches — this is your pot’s base. Now we build the walls:
- Round 7: working into the back loops only (BLO) of each stitch around — this creates a nice defined edge between base and walls (36)
- Rounds 8-13: sc around (36) — 6 rounds even, working through both loops as normal
At this point your pot should look like a small bowl or cup shape, about 2 inches deep.
Pot Rim (cream, optional)
- Round 14: switch to cream, sc around (36)
- Round 15: sc around (36)
- Fasten off, weave in ends
If you’d like extra stability so the pot keeps its shape and the cactus stands up straight, cut a circle of cardboard or plastic canvas slightly smaller than the base diameter and slip it inside the bottom of the pot before adding stuffing.
Cactus Body (green)
Now for the star of the show! We’ll work this as a rounded barrel shape that will sit inside the pot.
- Round 1: 6 sc in magic ring (6)
- Round 2: inc in each st (12)
- Round 3: sc, inc repeat (18)
- Round 4: sc 2, inc repeat (24)
- Round 5: sc 3, inc repeat (30)
- Rounds 6-16: sc around (30) — 11 rounds even (this builds the height of the cactus body — feel free to add or remove a couple rounds depending on how tall you’d like it)
- Round 17: sc 3, dec repeat (24)
- Round 18: sc 2, dec repeat (18)
- Stuff firmly as you go, packing it well so the cactus holds its rounded shape
- Round 19: sc, dec repeat (12)
- Round 20: dec around (6)
- Fasten off, close hole
Cactus Ridges (texture detail)
This is what really makes it look like a cactus! Using a contrasting shade of green (or the same green with a slightly different yarn weight for texture), work surface crochet lines vertically down the cactus body:
- With a separate strand, insert your hook from front to back at the base of the cactus, pull up a loop, then slip stitch upward through each round, following a straight vertical line to the top
- Repeat this for 6-8 evenly spaced lines around the body, creating a ribbed, segmented look like a barrel cactus
Small Top Cactus (optional second piece for added charm)
- Round 1: 6 sc in magic ring (6)
- Round 2: inc around (12)
- Rounds 3-5: sc around (12) — 3 rounds
- Round 6: dec around (6)
- Stuff lightly, sc closed
- Add ridge lines as above
- Sew to the side of the main cactus body near the top for a “double cactus” look
Flower (yellow or pink, optional but lovely!)
- Round 1: ch 2, work 10 sc into a magic ring or chain loop — this creates a dense base
- Round 2: ch 3, skip 1 sc, sl st in next sc repeat around — this creates small petal loops
- Fasten off
- Sew the flower onto the top of the cactus, slightly off-center
Spikes (white, optional embroidery)
- Using white or cream embroidery thread, add small straight stitches in clusters along the ridge lines — groups of 3-5 short stitches spaced evenly down each ridge create a classic spiky cactus look without being sharp or unsafe for little hands
Assembly
- Once your pot is complete, stuff the bottom third with fiberfill to give the cactus something to “root” into and to add weight/stability
- Place the cactus body into the pot, adjusting stuffing as needed so it sits at a pleasing height — typically about two-thirds of the cactus should be visible above the rim
- Sew the bottom edge of the cactus to the inner rim of the pot at a few points to keep it securely in place
- Attach the small top cactus and flower at this stage if using
Finishing
- Weave in all loose ends carefully, especially around the ridge lines where there are more ends to manage
- Give your cactus a gentle shaping squeeze to even out the stuffing and create that classic rounded barrel silhouette
- Step back and admire — you’ve made a cactus that needs absolutely no watering!
Thank you so much for spending this crafting session with us! We hope this cheerful little cactus brings a pop of color and personality to your space, no green thumb required. For more fun patterns and creative inspiration, be sure to visit us at Inspire & Create | Bringing Imagination to Life. Until next time, happy hooking and stay creative! 🌵💛