Cherry Red and White Checkerboard Nails: Step-by-Step Tutorial
Want a fun, retro pop-art manicure? This step-by-step guide shows you how to shape, paint, and create a precise checkerboard pattern in cherry red and white on natural nails. Keywords: checkerboard nails tutorial, retro nail art, red and white nails, gel manicure at home.
Bu Yazımızda Neler Var :
Welcome to Inspire & Create! 💅
Hi there, lovely reader! We’re so happy to have you back for another nail art tutorial. Today’s design is bold, fun, and full of retro energy — a classic checkerboard pattern in cherry red and white. Let’s get started!
Cherry Red Checkerboard Nails: Full Tutorial
What You’ll Need
Materials
- Nail file and buffer
- Cuticle pusher and cuticle nippers
- Nail prep solution (isopropyl alcohol, 70-99%)
- Primer (acid-free bonding primer)
- Base coat (gel)
- White gel polish
- Cherry red gel polish
- Striping tape (thin, for grid lines) or a fine detail nail art brush
- Small flat brush (for filling in squares)
- Top coat (gel)
- UV/LED nail lamp
- Small scissors or nail art tweezers (for striping tape)
- Lint-free wipes
- Cuticle oil
Skill level: Intermediate to advanced (precision pattern work)
Time required: 75-90 minutes
Step 1: Shape Your Natural Nails
- Wash and dry your hands thoroughly
- File each nail into a classic round/oval shape with a flat free edge, as shown in the reference photo
- Buff the surface lightly to smooth ridges
Step 2: Cuticle Care
- Push back cuticles gently with a cuticle pusher
- Trim only loose, excess cuticle skin with nippers
- Buff the nail surface again lightly to remove shine
Step 3: Cleanse and Prep
- Wipe each nail thoroughly with isopropyl alcohol on a lint-free pad to remove oils and dust
- Apply a thin coat of acid-free bonding primer to each nail, avoiding the cuticle and skin
- Allow to air dry for 30-60 seconds — do not cure under UV light
Step 4: Apply Base Coat
- Apply a thin, even layer of gel base coat to each nail, capping the free edge
- Cure under the UV/LED lamp for 30-60 seconds
Step 5: Apply White Gel Polish (Full Base)
- Apply a thin, even first coat of white gel polish over the entire nail, capping the free edge
- Cure under the UV/LED lamp for 30-60 seconds
- Apply a second coat for full, even opacity — white usually needs two coats for a clean, opaque base
- Cure again for 30-60 seconds
- This white base will serve as the “white squares” of your checkerboard
Step 6: Plan Your Checkerboard Grid
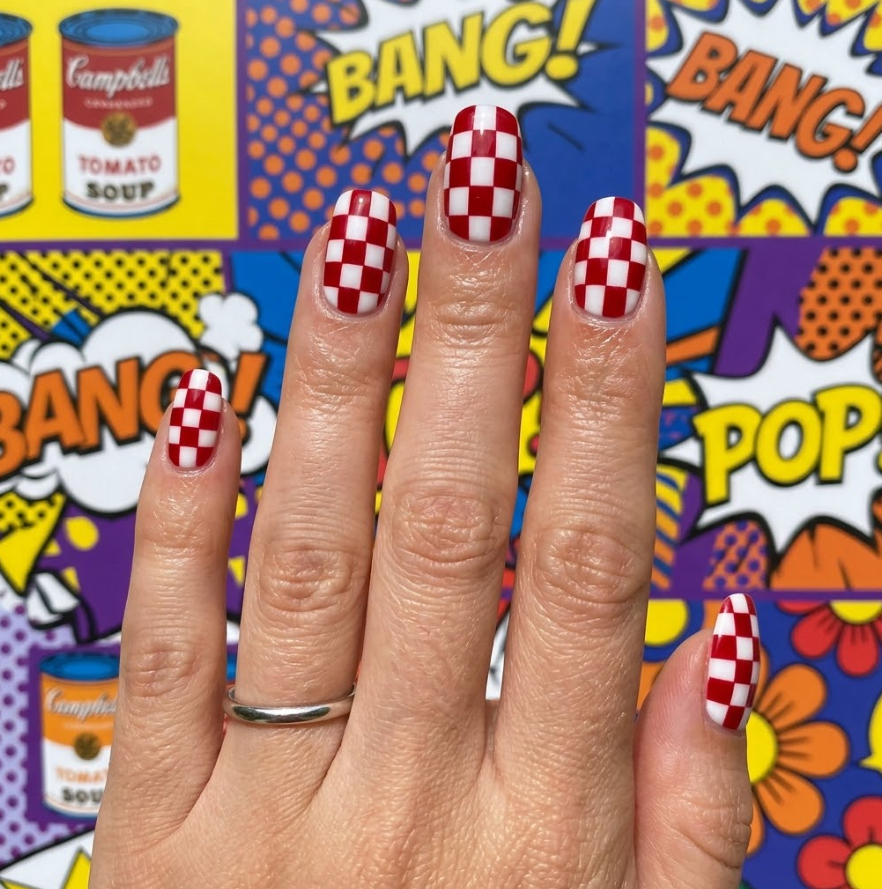
Looking at the reference photo, the checkerboard squares are roughly even in size, with about 3-4 columns and 4-5 rows visible per nail depending on nail size. The pattern starts from the cuticle and extends to the tip, with red and white squares alternating in both directions (like a real checkerboard).
- For smaller nails, a 3×4 or 3×5 grid works well
- Keep the squares roughly uniform in size for the cleanest look
Step 7: Apply the Grid Lines with Striping Tape
- Cut several thin strips of striping tape long enough to span the width of each nail
- Apply tape strips horizontally across the nail at evenly spaced intervals, creating horizontal “rows”
- Apply additional tape strips vertically, crossing the horizontal strips at evenly spaced intervals, creating a grid of squares
- Press down firmly on all tape pieces to ensure clean edges and prevent polish from seeping underneath
Step 8: Paint the Red Squares
- Using a small flat brush, dip into cherry red gel polish
- Paint red polish into every other square of the grid, following a checkerboard pattern — alternate which squares are red row by row, like a chessboard (red, white, red, white in row one; white, red, white, red in row two, and so on)
- Apply a thin, even coat into each red square, staying within the tape boundaries
- Cure under the UV/LED lamp for 30-60 seconds
Step 9: Apply a Second Coat of Red (If Needed)
- If the red looks uneven or sheer in the squares, apply a second thin coat to those same squares only
- Cure under the UV/LED lamp for 30-60 seconds
Step 10: Remove the Striping Tape
- While the polish is still slightly tacky (immediately after curing, before applying top coat), gently and slowly peel away all pieces of striping tape, pulling at an angle away from the nail
- This should reveal crisp white lines between the red squares where the tape protected the white base
- If any edges look uneven, use a fine detail brush with white polish to clean up the grid lines, then cure briefly
Step 11: Inspect and Touch Up
- Examine each nail closely for any red polish that bled under the tape or any gaps in the white grid lines
- Use a fine detail brush with the appropriate color (red or white) to touch up any imperfections
- Cure under the UV/LED lamp for 30 seconds after touch-ups
Step 12: Apply Top Coat
- Apply a thin, even layer of glossy top coat over each nail, sealing the free edge and locking in the checkerboard pattern
- Cure under the UV/LED lamp for 60 seconds
- Wipe each nail with a lint-free pad and alcohol to remove any tacky residue, revealing a high-shine, glass-like finish
Step 13: Finishing Touches
- Apply cuticle oil around the nail edges and massage into the surrounding skin
- Wash hands gently to remove any remaining residue
- Admire your bold cherry red and white checkerboard nails!
Tips for the Perfect Checkerboard
- Working on one nail at a time (tape, paint, remove tape, cure) before moving to the next gives you more control and prevents the tape from drying out or losing tackiness
- If striping tape feels too fiddly, you can freehand the grid with a fine detail brush instead — start with all horizontal lines, let dry, then add vertical lines, then fill in alternating squares
- Keep your squares slightly smaller than you think you need — checkerboard patterns look cleaner with more, smaller squares than fewer, larger ones
- This design is a fantastic accent for one or two nails only if a full set feels too bold — pair with solid red or white nails on the remaining fingers
Thank you so much for joining us for this fun retro checkerboard tutorial! We hope this bold cherry red design brings some playful pop-art energy to your hands. For more step-by-step beauty and craft tutorials, visit us at Inspire & Create | Bringing Imagination to Life. Until next time, happy painting! ❤️🤍💅
Keywords: checkerboard nails tutorial, retro nail art, red and white nails, gel manicure at home, pop art nail design, striping tape technique, bold nail art, intermediate nail tutorial