Holographic Chrome Stiletto Nails: Step-by-Step Tutorial
Want a futuristic, rainbow-reflective manicure? This step-by-step guide shows you how to shape, paint, and apply holographic chrome powder to long stiletto nails on natural nails. Keywords: holographic chrome nails tutorial, stiletto nail shape, rainbow chrome powder, gel manicure at home.
Bu Yazımızda Neler Var :
Welcome to Inspire & Create! 💅
Hi there, lovely reader! We’re so happy to have you back for another nail art tutorial. Today’s design is striking and futuristic — long stiletto nails with a stunning holographic chrome finish that shifts through every color of the rainbow. Let’s get started!
Holographic Chrome Stiletto Nails: Full Tutorial
What You’ll Need
Materials
- Nail file and buffer
- Cuticle pusher and cuticle nippers
- Nail prep solution (isopropyl alcohol, 70-99%)
- Primer (acid-free bonding primer)
- Base coat (gel)
- Black or dark gray gel polish (base color for holographic chrome)
- Holographic/unicorn chrome powder
- Chrome application sponge or soft silicone applicator
- No-wipe top coat (essential for chrome)
- Regular (wipeable) top coat
- UV/LED nail lamp
- Lint-free wipes
- Cuticle oil
- Tip extensions or nail forms (if extra length is needed for stiletto shape)
Skill level: Advanced
Time required: 70-90 minutes
Step 1: Shape Your Natural Nails into Stiletto Shape
- Wash and dry your hands thoroughly
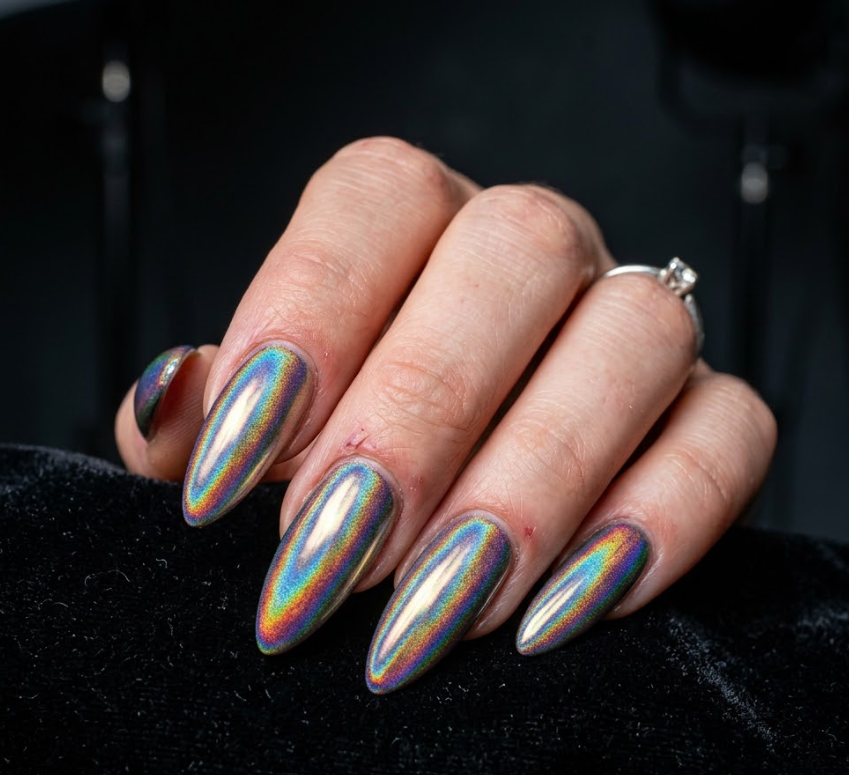
- File each nail into a long, sharp stiletto shape — tapering both sides into a single pointed tip, as shown in the reference photo
- This dramatic shape requires significant length, so if your natural nails are short, apply gel or acrylic tip extensions first and shape those into the stiletto point
- Be mindful when filing to a point — work slowly and evenly from both sides to keep the point centered
Step 2: Cuticle Care
- Push back cuticles gently with a cuticle pusher
- Trim only loose, excess cuticle skin with nippers
- Buff the nail surface lightly to remove shine and create a smooth, even surface — this is especially important for chrome, since any texture will show through the mirror finish
Step 3: Cleanse and Prep
- Wipe each nail thoroughly with isopropyl alcohol on a lint-free pad to remove oils and dust
- Apply a thin coat of acid-free bonding primer to each nail, avoiding the cuticle and skin
- Allow to air dry for 30-60 seconds — do not cure under UV light
Step 4: Apply Base Coat
- Apply a thin, even layer of gel base coat to each nail, capping the free edge
- Cure under the UV/LED lamp for 30-60 seconds
Step 5: Apply Black/Dark Gray Gel Polish
- Apply a thin, even first coat of black or dark gray gel polish, capping the free edge
- Cure under the UV/LED lamp for 30-60 seconds
- Apply a second coat for full, smooth opacity — a dark base is essential for the holographic chrome to show its full rainbow effect
- Cure again for 30-60 seconds
- Buff this layer very lightly if there’s any texture, as holographic chrome reflects every imperfection
Step 6: Apply No-Wipe Top Coat (Critical for Chrome!)
- Apply a thin, even layer of no-wipe top coat over the dark base
- Cure under the UV/LED lamp for 30-60 seconds
- Do not wipe away the tacky layer — this sticky residue is what allows the chrome powder to adhere
Step 7: Apply Holographic Chrome Powder
- Using a chrome application sponge or soft silicone-tipped applicator, pick up a generous amount of holographic chrome powder
- Gently rub the powder onto the tacky nail surface in circular motions with light, even pressure, covering the entire nail from cuticle to tip
- Continue rubbing until the surface develops a full mirror finish with visible rainbow holographic shimmer
- Pay extra attention to the elongated stiletto shape — work the powder evenly along the entire length, including the tapered point at the tip
- Work on one nail at a time so the tacky layer doesn’t dry out before applying the powder
- Remove excess powder with a soft, dry brush
Step 8: Check for Even Coverage
- Examine each nail under good lighting — holographic chrome shows every gap or uneven patch clearly
- If any areas look dull or patchy, apply a small amount of no-wipe top coat to just that area, cure briefly, and reapply chrome powder to that spot, then buff with the sponge to blend
Step 9: Seal with Top Coat
- Apply a final layer of regular (wipeable) top coat over each nail to protect and seal the holographic finish
- Apply carefully and in thin layers — too much pressure with the brush can disturb the chrome powder and create streaks
- Cure under the UV/LED lamp for 60 seconds
- Wipe each nail with a lint-free pad and alcohol to remove any tacky residue, revealing the full mirror holographic shine
Step 10: Finishing Touches
- Apply cuticle oil around the nail edges and massage into the surrounding skin
- Wash hands gently to remove any remaining powder dust
- Admire your holographic chrome stiletto nails — they’ll shift through rainbow colors with every movement!
Tips for the Perfect Holographic Chrome
- A dark base color (black, gray, or navy) makes the holographic rainbow effect much more vivid than a light base
- Apply top coat in light, even strokes — pressing too hard can drag the chrome powder and create dull streaks
- Stiletto nails are fragile at the tip — be extra gentle when buffing, sealing, and during daily wear to avoid chips at the point
- This finish photographs best in bright, direct light or with a flash, since the holographic effect depends on light reflection — a dark background (as in the reference) makes the rainbow shimmer pop dramatically
Thank you so much for joining us for this dazzling holographic chrome tutorial! We hope this rainbow stiletto design adds a bold, futuristic edge to your nail collection. For more step-by-step beauty and craft tutorials, visit us at Inspire & Create | Bringing Imagination to Life. Until next time, happy painting! 🌈💅
Keywords: holographic chrome nails tutorial, stiletto nail shape, rainbow chrome powder, gel manicure at home, advanced nail art, mirror finish nails, chrome powder technique, dramatic nail design