
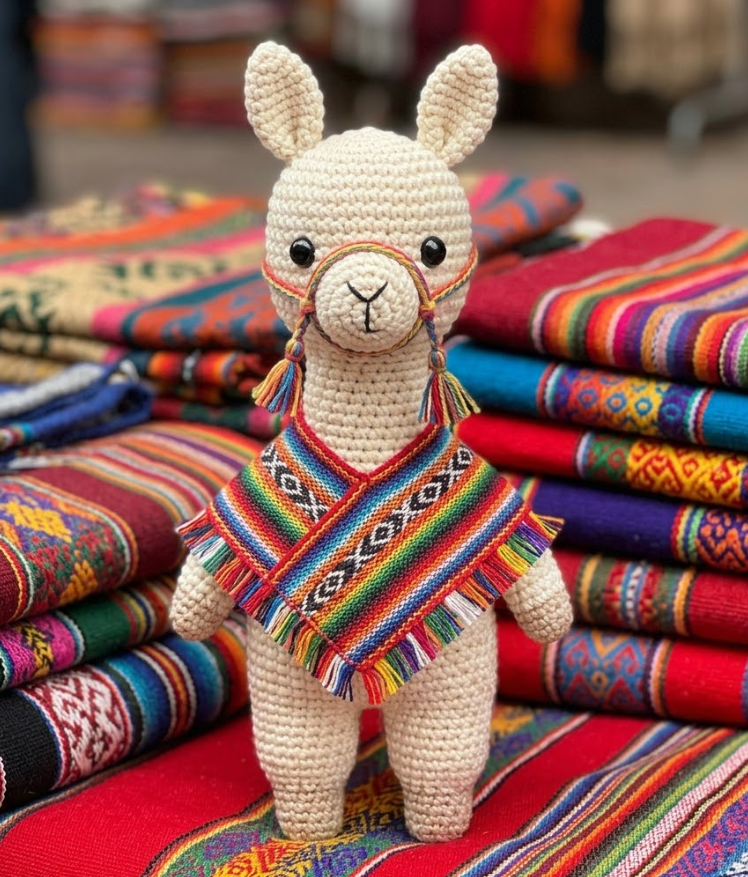
Charming Amigurumi Llama: Free Crochet Pattern with a Colorful Poncho
Crochet your own adorable amigurumi llama with this free step-by-step pattern! Featuring a fluffy textured coat and a vibrant Peruvian-inspired poncho, this pattern is perfect for colorful, cheerful decor. Keywords: amigurumi llama pattern, free crochet llama, llama with poncho, beginner amigurumi pattern.
Bu Yazımızda Neler Var :
Welcome to Inspire & Create! 🧶
Hi there, colorful maker! We’re so happy to have you back for another fun project. Today’s creation is bursting with personality — a sweet little llama dressed in its very own tiny poncho. Let’s get hooking!
How to Crochet an Amigurumi Llama: Step-by-Step Pattern
What You’ll Need
Materials
- Cream or white yarn (body, head, legs)
- Brown or tan yarn (face patches, ear tips, optional)
- Colorful yarn for the poncho — at least 3-4 bright colors (pink, orange, yellow, blue work beautifully for a Peruvian textile look)
- 3.5mm crochet hook
- Polyester fiberfill stuffing
- Safety eyes
- Yarn needle
- Black embroidery thread (nose, mouth details)
- Pink yarn (cheeks, optional)
Skill level: Beginner to intermediate
Finished size: Approximately 6-7 inches tall
Step 1: Crochet the Head (Cream Yarn)
- Round 1: 6 sc in magic ring (6)
- Round 2: inc in each st (12)
- Round 3: sc, inc repeat (18)
- Round 4: sc 2, inc repeat (24)
- Rounds 5-9: sc around (24) — 5 rounds even (llamas have a slightly elongated face shape)
- Insert safety eyes around round 6, spaced 7-8 sts apart
- Round 10: sc 2, dec repeat (18)
- Stuff firmly
- Round 11: sc, dec repeat (12)
- Round 12: dec around (6)
- Fasten off, close hole
Step 2: Crochet the Snout (Cream Yarn) — Elongated Shape
- Round 1: 6 sc in magic ring (6)
- Round 2: inc around (12)
- Rounds 3-5: sc around (12) — 3 rounds (this gives the characteristic llama snout length)
- Round 6: sc, dec repeat (8)
- Stuff lightly, sc closed
- Sew to the lower-front of the face, angled slightly downward
- Embroider a small black nose and mouth at the tip, with a soft curved line for the upper lip
Step 3: Crochet the Ears (Cream Yarn with Brown Tips, Make 2)
Llama ears are long, curved, and banana-shaped — a defining feature!
- Round 1: 6 sc in magic ring (6)
- Round 2: inc around (12)
- Rounds 3-7: sc around (12) — 5 rounds, switching to brown for the final round if desired for tipped ears
- Flatten and sc closed
- Curve gently into a banana shape as you sew them to the top of the head, angled upward and slightly outward
Step 4: Crochet the Body (Cream Yarn)
- Round 1: 6 sc in magic ring (6)
- Round 2: inc around (12)
- Round 3: sc, inc repeat (18)
- Round 4: sc 2, inc repeat (24)
- Round 5: sc 3, inc repeat (30)
- Rounds 6-14: sc around (30) — 9 rounds even (llamas have a longer body and neck than many other animals)
- Round 15: sc 3, dec repeat (24)
- Round 16: sc 2, dec repeat (18)
- Stuff firmly
- Round 17: sc, dec repeat (12)
- Round 18: dec around (6)
- Fasten off, close hole, sew to head — note that llamas have a fairly long neck, so you may wish to add a few extra rounds at the top of the body (worked at a smaller stitch count, similar to the flamingo neck technique) before attaching the head, for a more elongated silhouette
Step 5: Crochet the Legs (Cream Yarn, Make 4)
- Round 1: 6 sc in magic ring (6)
- Round 2: inc around (12)
- Rounds 3-10: sc around (12) — 8 rounds (llamas have notably long, slender legs)
- Stuff firmly, flatten and sc closed
- Sew two legs to the front and two to the back of the body so the llama stands
Step 6: Crochet the Tail (Cream Yarn, Small Fluffy Tuft)
- Round 1: 6 sc in magic ring (6)
- Round 2: sc around (6)
- Stuff lightly, sc closed
- For extra fluff, add a few short yarn loops around the tail using the fringe technique
- Sew to the back of the body
Step 7: Crochet the Poncho (Colorful Yarn — Stripes or Pattern)
The poncho is worked flat as a rectangle, then folded and seamed to create an opening for the llama’s neck and a draped fit over the body.
- Ch 20 (adjust based on body size — this should comfortably wrap around the llama’s body)
- Row 1: sc in 2nd ch from hook and across (19 sc)
- Rows 2-16: ch 1, turn, sc across, changing colors every 2-3 rows to create horizontal stripes (alternate between your 3-4 chosen colors for a vibrant, textile-inspired look)
- Fasten off
Adding Pattern Detail (Optional)
- With a contrasting color, work small geometric accents (a row of V-stitches, simple zigzag embroidery, or small diamond shapes) across one or two of the stripe sections for an authentic Peruvian textile feel
Assembly
- Fold the rectangle so the two short ends meet at the llama’s back, leaving an opening at the top center for the head/neck to poke through
- Sew the side seams partway up from the bottom, leaving the top open for the neck hole
- Add a small fringe trim along the bottom edge of the poncho using the fringe/latch-hook technique for an authentic finishing touch
- Slip the poncho over the llama’s head and onto the body, adjusting the drape so it sits naturally over the back and sides
Step 8: Finishing Touches
- Embroider small pink cheek circles below the eyes, if desired
- Weave in all loose ends
- Gently shape the ears into their characteristic curved position
Tips for the Perfect Amigurumi Llama
- A slightly fuzzy or boucle-style yarn for the body gives a more realistic, textured “llama fur” look if available
- Mixing warm and cool colors in the poncho stripes (like the reference-style Peruvian textiles) creates the most authentic, festive effect
- This pattern works equally well as an alpaca by shortening the ears slightly and rounding the face a touch more
Thank you so much for crafting this colorful little llama with us today! We hope it brings warmth, color, and joy to your shelf. For more free patterns and creative inspiration, visit us at Inspire & Create | Bringing Imagination to Life. Happy hooking, and see you in the next tutorial! 🦙🌈
Keywords: amigurumi llama pattern, free crochet llama, llama with poncho, beginner amigurumi pattern, crochet llama tutorial, amigurumi Peruvian textile, easy crochet llama, handmade llama gift