Sweet Amigurumi Mouse: Free Crochet Pattern with a Tiny Cheese Wedge
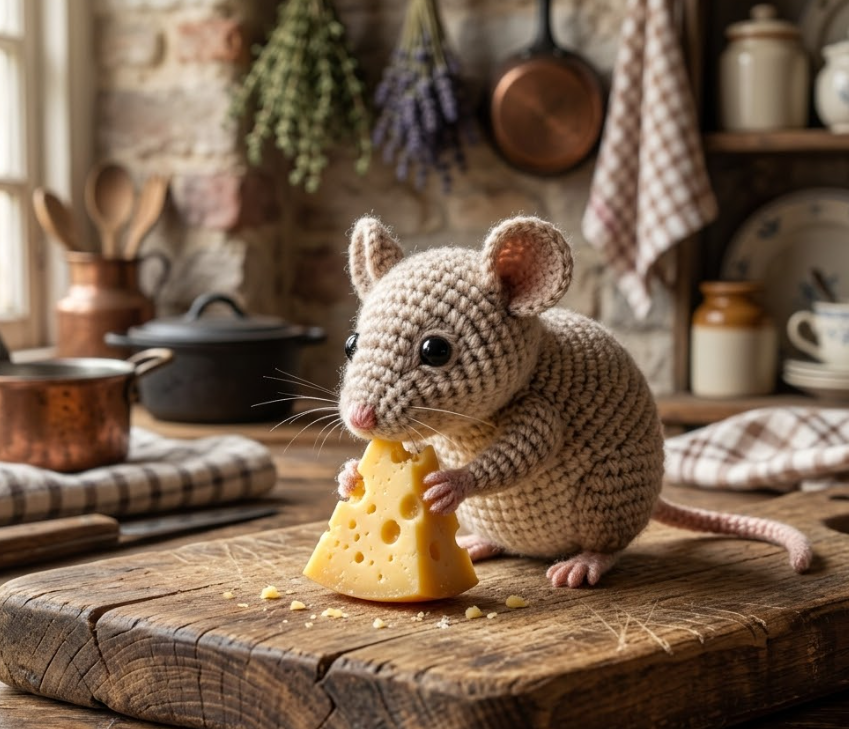
Crochet your own adorable amigurumi mouse with this free step-by-step pattern! Featuring oversized round ears and a tiny cheese accessory, this pattern is perfect for farmhouse-style decor and gifts. Keywords: amigurumi mouse pattern, free crochet mouse, mouse with cheese, beginner amigurumi pattern.
Bu Yazımızda Neler Var :
Welcome to Inspire & Create! 🧶
Hi there, lovely maker! We’re so happy to have you back for another fun project. Today’s creation is small but mighty in cuteness — a tiny mouse nibbling on its very own piece of cheese. Let’s get hooking!
How to Crochet an Amigurumi Mouse: Step-by-Step Pattern
What You’ll Need
Materials
- Gray or light brown yarn (body, head, tail)
- Pink yarn (ears inner, nose, feet)
- White or cream yarn (belly patch, whiskers)
- Yellow yarn (cheese wedge)
- 3.5mm crochet hook
- Polyester fiberfill stuffing
- Safety eyes (small size)
- Yarn needle
- Black embroidery thread (whiskers, mouth)
- Thin white thread or embroidery floss (whiskers)
Skill level: Beginner-friendly
Finished size: Approximately 3-4 inches long (mouse only)
Step 1: Crochet the Head (Gray/Light Brown Yarn)
- Round 1: 6 sc in magic ring (6)
- Round 2: inc in each st (12)
- Round 3: sc, inc repeat (18)
- Rounds 4-6: sc around (18) — 3 rounds even
- Insert safety eyes around round 4, spaced 6-7 sts apart (mice have eyes set fairly close together, slightly toward the front of the face)
- Round 7: sc, dec repeat (12)
- Stuff firmly
- Round 8: dec around (6)
- Fasten off, close hole
Step 2: Crochet the Snout Tip (Pink Yarn)
- Round 1: 5 sc in magic ring (5)
- Stuff very lightly, sc closed without further rounds (just the starting circle)
- Sew to the very tip of the face, just below and between the eyes
- Embroider a tiny black mouth line below the pink nose
Step 3: Crochet the Ears (Gray Yarn with Pink Inner, Make 2)
Mouse ears are large, round, and one of the most defining features!
- With gray yarn: Round 1: 6 sc in magic ring (6)
- Round 2: inc around (12)
- Round 3: sc, inc repeat (18)
- Round 4: sc around (18)
- Fasten off, flatten into a circle
- With pink yarn, work a smaller flat circle (Round 1: 6 sc in magic ring, Round 2: inc around = 12 sts) to sew onto the center of each gray ear as the inner ear detail
- Sew both ears to the top of the head, positioned wide apart and slightly forward for that classic mouse look
Step 4: Crochet the Body (Gray/Light Brown Yarn)
- Round 1: 6 sc in magic ring (6)
- Round 2: inc around (12)
- Round 3: sc, inc repeat (18)
- Rounds 4-6: sc around (18) — 3 rounds even
- Round 7: sc, dec repeat (12)
- Stuff firmly
- Round 8: dec around (6)
- Fasten off, close hole, sew to head
Step 5: Add the Cream Belly Patch
- Ch 2, work a small oval in rows: 3 sc in 2nd ch from hook, inc each end for 1-2 rows, then work even 1-2 rows, then dec back down
- Sew onto the front of the body from chin to belly
Step 6: Crochet the Arms (Gray Yarn, Make 2)
- Round 1: 5 sc in magic ring (5)
- Rounds 2-3: sc around (5) — 2 rounds
- Flatten and sc closed without stuffing (or very lightly stuffed)
- Sew to the sides of the body, positioned so they can hold the cheese wedge later
Step 7: Crochet the Feet (Pink Yarn, Make 2)
- Round 1: 5 sc in magic ring (5)
- Round 2: sc around (5)
- Flatten and sc closed
- Sew to the bottom of the body so the mouse can sit or stand
Step 8: Crochet the Tail (Gray Yarn, Thin and Long)
- Ch 12-14 (a simple chain works well for a thin mouse tail)
- Sl st back along the chain to reinforce, or work a single round of sc along the chain for a slightly thicker tail
- Sew to the back of the body, curving it into a gentle “S” shape for a natural look
Step 9: Add the Whiskers
- Cut 3-4 short strands of white embroidery thread or thin white yarn, about 1-1.5 inches each
- Thread through the snout area on each side, knotting close to the face to secure, then trim to even lengths
- Alternatively, embroider simple straight whisker lines directly with thread if you prefer not to add loose strands
Step 10: Make the Cheese Wedge
- With yellow yarn, ch 2, work a triangular wedge shape in rows: start with 3 sc in 2nd ch from hook, inc each end every row for 3-4 rows to widen the triangle, then work 1-2 rows even
- Fasten off, fold into a slightly 3D wedge shape and seam the open edge closed, stuffing very lightly for shape
- With a small embroidery needle and yellow or slightly darker yellow thread, add a few small random circles (French knots) across the surface to mimic cheese holes
Step 11: Attach the Cheese to the Mouse
- Position the cheese wedge between the mouse’s two front paws
- Sew or tack the paws gently around the edges of the cheese so it looks like the mouse is holding and nibbling it
- Optionally, position the mouse’s mouth area slightly touching the corner of the cheese for a “nibbling” pose
Step 12: Finishing Touches
- Weave in all loose ends
- Trim whiskers evenly if needed
- Gently shape the tail into its curved position
Tips for the Perfect Amigurumi Mouse
- Keep this project small and simple — mice are a great stash-buster pattern since they use minimal yarn per piece
- A two-tone color scheme (gray body with white belly, or brown body with cream belly) adds realism without much extra effort
- This pattern works wonderfully as a keychain or ornament by adding a small loop of yarn or a metal ring to the back before final stuffing
Thank you so much for crafting this sweet little mouse with us today! We hope it brings cozy, farmhouse charm to your shelf or kitchen nook. For more free patterns and creative inspiration, visit us at Inspire & Create | Bringing Imagination to Life. Happy hooking, and see you in the next tutorial! 🐭🧀
Keywords: amigurumi mouse pattern, free crochet mouse, mouse with cheese, beginner amigurumi pattern, crochet mouse tutorial, amigurumi farmhouse decor, easy crochet mouse, handmade mouse gift