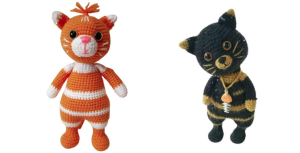
Unleash your creativity with our free Sylvester Crochet Cat Amigurumi pattern! This adorable and detailed crochet project is perfect for both beginners and seasoned crocheters. Amigurumi Crochet, Follow our easy-to-understand instructions to create your own charming Amigurumi Cat, a delightful addition to your amigurumi collection or a thoughtful handmade gift.
Bu Yazımızda Neler Var :
Materials
• Yarn (Pekhorka “Children’s volumetric”)
• Hook number 2
• Plastic eyes 10 mm
• Filler
You can take any yarn for crocheting cats.
The one you love or the one that is available.
If you do not want to crochet tabby seals, crochet a monochromatic one.
In the photo of the details, I have just such a one-color one.
If you decide to crochet a minke whale, then do not bother too much where to make which strip. Turn on your imagination and you will get your own unique Sylvester Crochet Cat.
Abbreviations
MR: Amigurumi Magic ring
sc : Single Crochet
inc : Increase
dec : Decrease
tr : Triple Crochet/ Treble Crochet
st: Stitch
dc : Double Crochet
hdc: Half Double Crochet
slst : Slip Stitch
ch : Chain
..in : make increase into same stitch as many as the number which is given in front of “inc” abbreviation (exp; 3inc, 4inc..).
FLO : Crochet into front loops only
BLO : Crochet into back loops only
Sylvester Crochet Cat Amigurumi- Left Foot
MAke 5ch and from the 2nd from the hook
1. 3sc, from loop 3 sc, 2sc, inc (10)
2. inc, 2sc, 3inc, 2sc, 2inc (16)
3. (sc, inc), 2sc, (sc, inc)*3, 2sc, (sc, inc)*2 (22)
4-5. (22 sc)
6. 5sc, 6dec, 7sc (17)
7. sc,dec, sc ,4dec, sc, dec, 2sc (11)
8-12. (11sc) 5 rows
13. (sc,inc)*5, sc (16)
14. (sc,inc)*8 (24)
15. (24)
16. 20sc(do not tie 4st),slst.
Cut and hide the yarn.
Sylvester Crochet Cat Amigurumi- Right Foot
we crochet similarly to the left 1-15 rows.
16. 24sc, 5sc, 1ch
We put a marker and continue along the left leg
17. 24sc on the left foot, sc on ch, 24sc on the right, sc on ch(50)
18-23. (50sc) 6 rows
24. 12sc, dec, 21sc, dec, 13sc (48)
We make dec on the sides of the body.
25-26. (48sc)
27. (6sc, dec)*6 (42)
28-30. (42sc)
31. (5sc, dec)*6 (36)
32-34. (36)
35. 10sc, dec, 16sc, dec, 6 (34)
36. 9 sc, dec, 15sc, dec, 6 (32)
37. 8sc, dec, 15, dec, 5 (30)
38. (30)
39. (3sc, dec)*6 (24)
40-41. (24)
42. (2sc, dec)*6 (18)
43. (18), slst
Cut the yarn and hide the tail.
Head
1. 6sc in MR
2. 6inc (12)
3. (1sc, inc)*6 (18)
4. (2sc, inc)*6 (24)
5. (3sc, inc)*6 (30)
6. (4sc, inc)*6 (36)
7. (5sc, inc)*6 (42)
8. (6sc, inc)*6 (48)
9. (7sc, inc)*6 (54)
10-17. (54sc)
18. (7sc, dec)*6 (48)
19. (6sc, dec)*6 (42)
20. (5sc, dec)*6 (36)
21. (4sc, dec)*6 (30)
22. (3sc, dec)*6 (24)
23. (2sc, dec)*6 (18)
Cut off the yarn and leave a ponytail to sew the head to the body.
Upper legs
1. 6sc in MR
2. 6inc (12)
3-7. (12sc)
8. dec, 10sc (1)
9-19 (11sc)
Cut the yarn. Leave the tail for sewing.
Ears
1. 4sc in MR
2. (1sc, inc)*2 (6)
3. 2sc, inc)*2 (8)
4. (3sc,inc)*2 (10)
5. (4sc,inc)*2 (12)
6-8. (12sc)
Cut the yarn.
Leave the tail for sewing
Muzzle
1. 6 sc in MR
2. 6inc (12)
3. (1sc,inc*6 (18)
4. (2sc,inc)*6 (24)
5. 11sc, slst
Tail
1. 6sc in MR
2. 6inc (12)
3-23. (12sc)
24. fold together and crochet 6 sc
Assembly
1. Sew the torso and head.
2. We make out the cat’s face.
– Place the eyes between 10-11 rows
6 columns spaced apart
– Sew the muzzle between 12-16 rows, adding filler to it.
– We embroider the nose, mouth, antennae.
3. Move the ears, choose a good place for sewing.
4. Sew the upper legs on the sides of the body.
5. Along the line of the middle of the back, between 23-24 rows we sew a tail
6. If the yarn is fleecy, you can comb the cat. I will comb it with a piece of Velcro that comes in for fastening clothes.
Everything. Now the cat is ready. We kiss him on the nose and give him a name.


