Here is the video tutorial
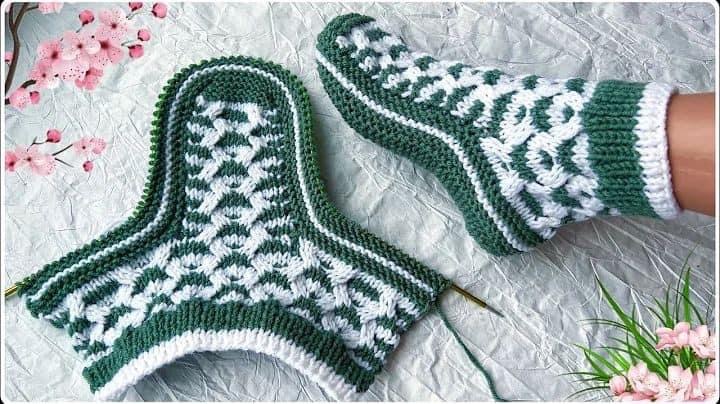
Hello Ladies, welcome to my channel. In this video, I will explain to you a very beautiful seamless booties model with two knitting needles. I used booties yarns that you can easily find in the market for my booties. My needles are in green and cream tones and they are two short needles like this. Ladies, let me show you my model right now. Here is our model. I made a very beautiful model with a heart, it is very stylish in appearance and its stance on the feet is very comfortable. I want to show you the sole and the heel. Ladies, there are no stitches anywhere on my booties. I made them completely seamless. It is a very beautiful and elegant model. Ladies, this booties is 37 according to the size of my hand. It is suitable for feet size 38 and 39. Those who want to make it larger can make the number of garter stitches larger at the back. Those who want to make them smaller can reduce the number of garter stitches. If you make the front sections in the same number as me, the booties will be compatible with your feet. Let’s start right away. Ladies, we are starting from the toe side of my booties. I will start with my cream thread. First of all, my thread is at the end. There is a knot like this, let me untie it and I’m casting 5 stitches. Ladies, I’m going to start my booties with 5 stitches. I’m going to tie this first stitch . I’m going to tie this fourth stitch. We’ve tied our five stitches here. Now we’re going back. Ladies, I made it with the harasho knitting technique from start to finish. It happens when you knit purl stitches on both the front and back sides , it becomes garter stitch. I get the garter stitch by knitting plain knitting on both sides of my knitting. At this stage, I took our edge stitch and knit the other stitches as stockinette, that is, plain. I accept that we have five stitches. If our starting thread is on the left side, this is a tiny stitch. Our yarn means the front side. Ladies, we will start increasing our increases after knitting the first two stitches. We will also knit until the last two stitches remain and do so. We knit one stitch right next to our edge stitch and the entire edge stitch as a garter stitch. In this way, we do the increase only on the front side. I’m back, I’m turning the front side stitch again, 9 stitches on the edge, the back side again, no increase on the back side, we will start our edge stitch and model at this stage. For this, I put my green yarn right next to me, I prepared it, now we will increase our edge stitch. Ladies, we are starting the model while increasing 11 stitches, I knitted our second stitch. I am immediately increasing the stitches I have increased. The stitches I have increased are 3 stitches. I am knitting one more stitch. I am adding 4 stitches on the 4 sides. This is 1, this is 2, this is 3. Now, I will tie the end of my green rope with my cream like this. I will tie two tight knots here so that my booties do not come apart. Then I took my cream again and added one more stitch of cream. Ladies, we will knit the stitches on the back side with the colors we see. I took our edge stitch . I knit the green stitches with my green thread. I left my green stitch at the back. I took my cream again. I knitted the last four stitches of my needle on the front side. I took my green thread. It is important to do this. Ladies, in this model, there is no hole between them. When I take the thread diagonally, I knit two green stitches here. 2 green stitches, one cream thread in the middle and I knit two more green ones next to it. I left my green thread and took my cream one. I knitted one cream again. Look, I knit the last two stitches here with my cream thread. In this way, now we will knit the back side with the colors we see the stitches on the back side, cream stitches with my cream rope and green stitches with my green rope, look, I knit my creams, I leave my cream behind, I pass it under the cream, I took my green in my hand, I left our two green stitches behind, I took my cream rope, we continue with the remaining 4 stitches and increase. We will continue and I take our edge stitch by passing it under the cream. I am knitting 2 green stitches. I will knit 3 cream stitches in the middle. Our 1 2 3 heart shape is opening. Ladies, we are knitting two more green stitches next to it. I took my cream again and knitted a stitch of cream. Look, here we are knitting our last two stitches with the colors we see the stitches. There is no action to be done on the back side. Ladies, we knit the stitches as we see them. I made a different yarn and used the green stitches with my green thread. I knit again, I change the yarn, I left the 3 cream stitches in between, I took my green stitch, we continue to increase our two green stitches to our model, we continue to increase our edge stitch, stop here, I knitted my green stitch, I knit a cream right next to it and look, there is the last stitch, I also increase it immediately. I knit the remaining stitch straight like this. Now back, ladies, we are knitting our stitch on the back side as we see it, there is no increase process. I knit the cream stitches with my cream thread and the green stitches with my green thread. When changing the thread, our thread remains on the back of the booties. This is the point we need to pay attention to. I knitted 5 cream stitches immediately and I take my green stitch again. We will continue to increase our two green stitches. After knitting the stitch, I immediately increase it. I knit another stitch next to it. I have 4 stitches on the edge. I take my green thread by passing it under my cream again, I knit green, then this time I will have 7 creams in the middle. 1 2 3 4 5 6 and 7 I immediately take my green yarn, I knit 2 stitches of green here , I took my cream again, I knitted one cream, and then I increase here, Ladies, we have made the remaining two stitches, now Ladies, there is no need to continue the video on the back side, let’s knit the stitches on the back side with the colors we see, as in these subsections. Yes Ladies, I have knitted the stitches on the back side, we are continuing our model on the front side again. At this stage, I will knit our edge stitch one more green, opening our heart shape here. Then I knit a cream. Look, let’s knit the last two stitches with the colors we see. Let’s come. Yes Ladies, we continue our model on the front side again, our edge stitch . I’m knitting 4 more stitches. 5 In this row, I have 5 creams on the edge. Now I will change the yarn. I’m taking my green. I’m knitting these two greens with green again. After this row, I took my cream. I’m going to knit 4 stitches of cream. Ladies 1 2 3. Look, while we’re knitting our stitch in this row, my green rope at the bottom is long at the back. In order not to leave this diya, I knit my green stitch here and then a green one here. Look at the middle again. Ladies, we have done exactly this part. This is the second part. We have created the bottom point of our heart. I am knitting 4 cream again. 1 2 3 4 I am knitting the green stitches here again with my green yarn. I took my cream yarn, I knit the last two stitches and knit the stitches straight like this. Ladies, now let’s knit the stitches on the back side. Yes Ladies, we will continue our model on the front side. I am currently knitting 23 stitches. Then we will continue on 25 stitches. We will not increase. We will knit the stitches on the edge again . Then I knit 3 green stitches in this middle. 1 2 3 again. Ladies, after 3 green stitches, I knit two cream stitches and knit two more green stitches . Now let’s knit the last two stitches as we see our stitch. Let’s move on. Yes, Ladies, we are done increasing the front side again. We will just continue with our heart model. Let’s continue by counting this row and knit the remaining stitches of our edge stitches with the colors we see already 8 stitches. Let’s go. Yes Ladies, we will continue our model on the front side. At this stage, Ladies, what we will do is, let’s continue by counting the stitches, 5 6 7 8 9 stitches from the edge and the first entry of our heart. We have started, now let’s knit the stitches on the back side with the colors we see. Yes Ladies, we continue the model on the front side again. I took my cream yarn again, let’s count. Ladies, I knitted our edge stitch with my cream yarn, now I am changing the yarn again. I took my green one and knit two green ones. Ladies, two green hearts are opening, 5 cream ones in the middle. I will knit 3 4 5 and again I took my green and I am knitting two more greens. I took my cream here again and I knit all the remaining stitches plainly with my cream yarn. Let ‘s knit the stitches on the back side. Let’s come. I knitted the stitches on the back . I am here again. Ladies, we continue the model. I’m knitting it with my cream yarn, look like this, our second heart has been formed. Now, let’s knit the stitches on the back side. Let’s go, I knitted the stitches on the back side. I’m back on the front side. Ladies, let’s go by counting again. This time, I’m taking my edge stitch. I’m taking my green yarn from the bottom. I’ve knitted two green ones. Now I’ve passed on my cream. In this row, I’m knitting 9 creams in the middle. 1 2 3 4 5 6 7 8 9 I’m taking my green yarn again. I’m going to knit 2 green ropes. Look. My transitions look flexible at the back, then I take my cream again and knit the remaining 6 stitches straight with my cream rope. Let’s knit the stitches again on the back side. Let ‘s move on. Yes, ladies, we continue our model on the front side again. Here, I knitted 2 green stitches in the same way and took my cream again. By the way, 3 This base of our heart, Ladies, I will knit 4 cream stitches. 1 2 3 4. I knit one green stitch right in the middle. I knit 4 stitches of cream again. Let’s knit the two green stitches here as we see. Let’s go again. Yes, Ladies. We continue our heart model on the front , we knit the edge stitch, then I took my cream thread again, I knit all the remaining stitches with my cream thread , I knit the stitches on the back, let’s go. Yes, ladies, we continue our model on the front again, let’s count the stitches, I knitted our edge stitch with cream again, my green thread. I’m going to knit 4 stitches of green. Ladies, 1 2 3 4. I’m knitting a stitch of cream right in the middle and next to it, I’m knitting 4 more green stitches. This is the 3rd and this is yesterday. I took my green cream yarn and knitted the next stitches with cream. I’m completing my row. Let’s knit the stitches on the back side. Let’s go to the front again. Yes, ladies. We continue with our percentage model again, let’s go by counting the stitches from the edge, green, right in the middle, I will knit 3 cream stitches, 3 stitches of cream. This is my 1 2 3 cream again. I take my green and knit two more green. This is the last row of our second heart. Ladies, this is the last row of our heart. I immediately took my cream thread again and knit the remaining stitches on my needle. I am knitting with cream, let’s knit the stitches on the back side again and let’s come. Yes Ladies, we will start to open our 3rd heart on the front side again. Now let’s go by counting the stitches again and make our edge stitch 5 6 7 8. Let’s knit the stitches on the back side. This time I will knit 7 stitches from the edge with cream. It became 4. 5 6 7. I take my green yarn again. I knit 2 green stitches here. I will knit 5 creams in the middle. 1 sorry, I will knit 7 creams. In the previous row, I knitted 5 creams. Now it will be 7 and I knitted all 7 creams. I take my green again, I knit two green stitches in my hand and let’s knit the remaining 7 stitches. Let’s go. Yes Ladies, let’s go by counting the front side again. knitted 6 cream stitches from 5 and 6 edges. I will knit the following 1 2 3 4 5 6 7 8 9 I knit 2 more stitches green next to it and complete the remaining 6 stitches. I complete my row. Let’s knit the stitches on the back side. Let’s go. Yes, ladies, we will start the front side again, this time we will start this middle part of our heart . I took my cream again, I will knit 4 creams in the middle, now 1 2 3 4. I will knit a green one here. I immediately take my green yarn. I knit the green loop with my cream yarn and complete my row. Let’s knit the stitches on the front and back side with the colors we see. Let’s come back to the front side. Ladies, we will continue our heart model. 1 time, knit 7 stitches from the edge, 2 cream, 3 green, right next to it. It goes the same way as the model below. 2 cream, right next to it, I knit two more green stitches. I took my cream yarn again, let’s knit the remaining 7 stitches. Yes, ladies, again on the front. We continue our heart model. Let’s go by counting our stitches again. I knit our edge stitch with my yarn and complete my row on the front side. Ladies, we are about to finish our 3 hearts. Now let’s knit the stitches on the back side and come on. Yes Ladies, we will knit the stitches on the front again. We will make the last row of our heart. Now let’s go by counting the stitches again. I will knit our edge stitch 1 2. I will knit 3 creams in the middle. 1 2 3 I will knit two green stitches here again and knit the remaining stitches with my cream yarn. I will knit and complete my row. The last row of our heart was like this, Ladies. Now let’s knit the stitches on the back with the colors we see. Yes, Ladies, my booties are on the front again. At this stage, we will knit our ladies’ stitches completely with our cream yarn. Now we will cut our green yarn. For now , we have nothing to do with our green yarn on the front. We will knit it in a haraşo way. Look, after knitting this first green, I will cut the end of my green yarn like this and tie it to my cream yarn. For now, let my Green wait aside. We will knit the stitches with our cream yarn. Ladies, let’s knit the stitches with our cream yarn until the end of the row. We need a garter stitch to fall on the face with our cream thread. Let’s knit it like this. Yes, ladies, I knitted a garter stitch and came here. Now we will do the wrist part. There will be cuts in this section. Ladies, first of all, I will knit our total edge stitches, 7 8 stitches from this edge, and 8 stitches from the right edge. I’m cutting it by collecting two by two. Look, my first cut is the second 3 , 4, 5 , 6, 7 , 8 and 9. Look, here we have 9 stitches now. Ladies, first of all, we will make the left edge of this bootie, that is, we will make this edge. Ladies. At this stage, we will make eight stitches on the right side. If you have a spare needle, use spare stitches like me. Otherwise, you can prevent the stitches from escaping by threading a thread through these stitches with the help of a crochet hook. Now we start on the left edge. This is our first stitch, I turn the 8 stitches here. I knit the back side again as a garter stitch. We will knit 4 garter stitches out of 8 stitches. Ladies, 4 garter stitches. Now back. We turned around and looked at Z. There will be a total of 4 teeth. Ladies, we continue, when we knit the stitches on the front and the back side, it becomes a harasho stitch. We will knit until there are 4 crochet stitches. Now I have knitted it on the front side, I am going back and I knit the stitches on the back side again as harasho. In this way, Ladies, two threads of garter stitch have fallen on the front side. I’m going back again. I’m knitting the front side stitch as garter stitch. I’m back again. I’m going to knit the stitches on the back side with the stitches straight. So, there will be three threads of garter stitch. We’re back like this. When we look at the front side from here, Ladies, look there. It has become a 3 threaded garter shoulder, now there will be one more thread stitched shoulder, so we will knit the stitches straight once more on the front and back side. Look, I have knitted the stitches on the front side, I am going back, I will knit the back side again and the stitches on the back side. This way, it becomes a D thread garter shoulder. Now, ladies, back. We are back, we will start our increases, at this stage we will do the increases as follows . We are going back Ladies, there is no increase on the back side, we will knit the stitches completely in garter stitch. We increased our 8st stitch by one stitch, I knitted all 9 stitches, look again, I am going back, we will increase our increases again on the front. Look, we will increase our increases from this wrist section again, our edge stitch. Look, I am attaching my needle to this side, here. We will increase the stitches we took until we have 13 stitches. I’m back . I’m knitting the stitches on the back side again as garter stitch. Ladies, I’m knitting the stitches on the back side as garter stitch. We’re back again, increasing the front side. We continue again. I’m attaching our edge stitch . I’m knitting the stitches I took from here. We knit all the stitches as garter stitch. I put my last stitch, our edge stitch, and my needle here. I knit it plainly. I knit the remaining stitches plain again . Thus, ladies, we will increase our 12 stitches once again. We will not increase our 13 stitches anymore, ladies. We will continue with 13 stitches. Now, I knit the stitches again on the back side. Now we are back, let’s check again and count 4 8 12 Yes, we will increase our 12 stitches. Now I am attaching the first stitch to the shim. Ladies, the stitches I took from here will be 13 stitches in total . It was haraşo. This is what we did for my edges. Let’s count how many threads are haraş shoulder. 1 2 3 4 5 6 7 8 9 9 teeth are haraş shoulder. As soon as we count the rows, now I am this bootie. I knitted this edge of this bootie with 15 rows of haraşo. Ladies, it is perfect according to the size of my hand. Welcome to continue. I made it using 13 stitches. At this stage, ladies, you can measure the booties on your feet. You can get much better and more accurate results. I will show you on a machine like this. You need to hold the toe part of the booties on your foot, starting from the toe, like this. Measure it this way. Stretch it a little while measuring. Because harasho knitting has flexibility, you need to do it this way until it reaches the edge of your heel. I made 15 rows, it was perfect according to my measurements. Maybe you will do more, maybe less. This may vary completely according to your measurements . Let’s complete this left edge with 13 garter stitches, then let’s start working on the right edge together. Yes, ladies, I have completed my left edge and now there are 15 rows of garter stitch. Now we will cut. Ladies, I will cut the front side by gathering the stitches two by two. Let’s make a loose cut at this stage. Because while making the heel of my booties, look at these cutting places. We will remove loops from the loop places here. Let’s make a loose cut so that I can easily remove the loops. I collect the loops two by two and cut them in order. I am cutting the last stitch now. Ladies, we have now finished the left side of my bootie and we will start on the right side. At this stage, Ladies , I will add my rope from the back side. We will knit garter stitch. Ladies, first of all, I need to knit 4 garter stitches over eight stitches. I start by adding my yarn here. I will take my thread towards the back. I take our second stitch forward. My knot is left behind. I knit the stitches in garter stitch. This is how we knit garter stitch over eight stitches. Lady, when we look at it, we see that there is a garter stitch stitch here. Here it is, let’s knit it over eight stitches in this way until it becomes a shoulder with 4 threads . Yes, ladies, it is D thread over 8 stitches. Look, I knitted here and here I am. Now we will make our increases here again in the wrist section. Ladies, we will make our increases in the wrist section. We will knit until the last stitch remains. First of all, here too . We will increase it until there are 13 stitches. Now we will increase the front side stitch. 7. Look, I am turning one last stitch here. There is no increasing process on the back side. Ladies, we knit our edge stitch on the front side until there is one last stitch left. I took it without knitting, I am knitting all the stitches on the back side as plain again. Ladies, now I am knitting the last stitch on the front side again, this stitch on the front side, we are knitting all of the stitches that I took from here as flat. My knitting needle is now 11 stitches. We will continue to increase our stitches until it reaches 13. Now, again, the last stitch on the front side again. I am attaching one stitch to this stitch in front of the stitch I knitted , the stitch I took from here, 8 and 12 stitches. Ladies, we will knit the stitches on the back side completely without increasing, we will increase for the last time on the front side and I go back to our 13 stitches . I am attaching the stitch I took from here. Now we will make the stitch over 133 stitches. We will not increase. Ladies, I made 15 garter stitches on the left edge of this stitch, and I will make 15 stitches on the right edge. You need to do the same number of stitches on the right edge as you did on the left edge, because your edges must be equal now. Let’s all complete my right edge with 13 stitches, just like the left edge. Let’s come and then start the edges of my booties together. Yes, ladies, I have completed my right edge as well. I have knitted 15 rows of garter stitch here. Ladies, we made a cut on the front side. Here we go back. We will cut on the back side. After cutting, my threads This will remain on the edges, this should not remain on the inside. First of all, I am cutting the stitches again by gathering them two by two. We will make a flexible cut again. Ladies, I will cut the stitches by gathering them two by two, so that it is a loose cut. Then we will move to the edges of my booties. I cut the stitches one by one . I tighten the last stitch here and cut the rope. Now, Ladies, I will cut the stitches on the top of my booties. So we have completed the section. This is our image. We will continue with our green rope. Ladies, we will immediately remove loops from our green rope from this left edge. I prepared my green rope as follows. At this stage, Ladies, this part can be done with fishing line needles. But I really have a hard time using the line needles. It seems very difficult to me. That’s why it is so short . I will complete this part of the bootie with needles. Ladies, we will remove stitches from here. The edge stitch. Look, our first edge stitch is here. Here, I inserted my needle into the two wings of the stitch. I am removing a stitch. Ladies, we will remove stitches from here, one by one. I enter the next edge stitch again. I remove the stitch from both wings of the stitch, right at the end of the green rope. I’m going to tie yourself a knot like this. Ladies , we’re going to remove loops from our green rope. Look, we’re going to get into the edge loops, and we’re going to remove loops one by one. While removing our 3 stitches, I’m hiding the end of the green rope and taking it away. We’re going to remove these 5 stitches. We started with 5 stitches on this toe part of this bootie. We started with 5 stitches on this toe part. I removed the stitches. If you made more stitches than the number of garter stitches , you can remove 45 or 46 stitches. If you made fewer stitches, you can also remove 40 stitches. This may vary depending on your measurements. Now let’s remove the stitches up to the nose part and come on . Yes, ladies, we did not start with 5 stitches on the nose. We will remove 5 stitches, I will put the stitches I removed from there on another needle, since our starting place is a little tight, I will remove the stitches using a crochet hook, so that the ladies will not have difficulty in removing the stitches , I will put my needle on, now look, I will insert another needle, like this, by entering between the stitches again, we remove 5 stitches from the place where we cast five stitches, see here. I’m removing our second stitch. We’ve removed 5 stitches here. Now, I’m going to remove a stitch on my other needle. Look , go into the edge loop places on the other side and look, let’s enter the edge stitch place and remove our stitch. Yes, ladies, I removed 43 stitches to this edge and came back. Now we’re going back. Ladies, we’re doing these sections. Here we will apply harasho knitting. Ladies, as you can see, we have harasho knitting here. At this stage, for our first stitch, I am knitting our stitches plainly. In this way, I will apply completely plain knitting, creating a harasho look on the front. Ladies, we will knit completely plain knitting like this. Now Ladies, we will knit this needle in this way. We will knit the stitches on the nose and the other needle stitches in the same way, knit them straight and let’s come. Yes Ladies, I have knitted the stitches in this way until this part and I came, look, we have a green thread and a stocking shoulder. Now I will add my cream, one thread with cream and one thread with green, we will make this edge with stockinette stitch . Now I’m adding my cream yarn. I’ll tie the end of the rope to the first stitch like this again. We’ll continue with the garter stitch. Ladies, as I said, we made one thread with green, and we’ll knit another with cream. We’ll knit it up to the other end. We’ll go back and knit the stitches straight again. This way, we’ll knit one thread with the garter stitch. My cream rope will form a shoulder, look at it by hiding the end. I’m knitting the stitches straight again. This is the process we will do. Ladies now. Ladies, we will knit the stitches like this until the end. Then we will knit them straight and come back here. This time, look, I’m in the second section right there. In the second part, cream garter will form, then continue with green. we will green with a tooth We will knit haraşo, after the green is finished, we will knit a haraş shoulder with our cream thread in one thread, so there will be 4 rows of haraşo shoulders, green 1 cream, 2 green, 3 cream, 4 like this. This edge needs to have 4 teeth haraşo, now let’s complete the edge of my booties like this, then let’s move on to the base of my booties together. Let’s start from the beginning . Yes Ladies, I knitted these edges of my booties and here I am. Look, there are four teeth stockinette. Now we will make our base, starting from the nose. First of all, Ladies, I knit 43 stitches of my knitting stitch, the stitches are completely straight. Since there is no detail to be explained here, I knit the stitches quickly. Ladies, we will start from the nose, there were 5 stitches on our nose. 15 We will expand the base by taking stitches from the edges until it becomes a stitch , then we will knit our sole over 15 stitches and complete it. We will continue in this way, but first, we will knit the first 43 stitches here. Yes, now we have come to the nose section , we will remove 5 stitches here. Ladies, we will again remove our 5 stitches here without knitting , so that these joints fall smoothly on the other parts. I will knit the stitches straight again. Now ladies, after taking one stitch from my knitting needle on this side, I went back again. My yarn is on the opposite side again. I turned our first stitch again and 7 stitches. After taking one stitch, we go back. My yarn is again on the opposite side. Our first stitch is on this side. Our eight stitches in the middle. I am going back again. Our first stitch is on the opposite side. Our number of stitches is increasing. Ladies, now I’m back again. My yarn is opposite. Now we’re turning one stitch. Ladies, my yarn is opposite. First of all, we’re going to knit our first stitch . We’re going to knit 11 stitches. And my knitting needle is knitting one more stitch and adding it to the middle. Thus, we continue this until we have 15 stitches, 12 stitches in the middle. Ladies, my yarn is on the opposite side again , I knitted one stitch from the first stitch and added it to the middle part again. I returned our 13 stitches in the middle. Ladies , my yarn is again on the opposite side, I take our first stitch, knitted all 13 stitches in the middle part, I knitted one stitch on my needle and added it to the middle part again. This time, I am returning our 14 stitches here, my yarn. My first stitch on the opposite side is 14 stitches , I knitted one stitch on my needle and added it to the middle part again for the last time. Now my needle has 15 stitches. Ladies, we will knit our base as 15 stitches. The process we will do at this stage is over 15 stitches. We will continue like this. My yarn is on the opposite side again. While knitting our first stitch, I take one stitch on my needle. I’m knitting by cutting both of them together . Now we’re going back, after cutting, my yarn is on the opposite side again, we’re going to knit our first stitch, that is, we’re going to knit until there’s one last stitch left on our base, while we’re knitting the last stitch, we’re going to make the cut. Look, here’s one last stitch again. So, Ladies, the base of my booties continues as 15 stitches, again, I’m going to knit our first stitch on the opposite side of my yarn. We have 15 stitches left, I’m knitting this stitch by cutting it together. After cutting, we go back again. My yarn is opposite. I’ll make the first stitch on the opposite side. I’ll make the last stitch on my base. Look, Ladies, I’m knitting by cutting one last stitch here. Ladies, look at our base like this. Our shape and appearance will continue over 15 stitches. Now, we will continue this process, Ladies, this right and left stitch. We will continue until the stitches on the first needle on my left needle are finished. Now, all together, I will knit the base of my bootie in this way over 15 stitches. Knit until the stitches are finished and let’s come. Yes, ladies, I cut the base of the bootie in this way and here I am. I will show you. Ladies, we will make it using 15 stitches. Again, my rope is on the opposite side. I cut the first stitch together and knit it. There are 14 stitches left. My needle is now. Ladies. At this stage, we enter these edge loop places and remove the stitches. Look, I entered the green edge stitch place and removed a stitch from both wings of the stitch. I am going back with 15 stitches again. Ladies, my thread is again. We are cutting our first stitch on the opposite side. Ladies, we are removing stitches from the edge loops. The back of my booties is knitted like this. Look, we are turning our last two stitches and removing them from the front. Ladies, we are removing stitches from the green edge loops on the opposite side. He had removed a loop. Here, I enter the green edge stitch place. From here, we will make the loop . The back part will be done like this. Ladies, we can hide the threads by passing them through the back loops. Call me for a video. I will hide them. Look completely. I place the last two stitches in the edge stitch. I enter the creamy area and remove one loop. I am back. My rope is on the opposite side, we knit our first stitch until there is a stitch left, we cut the last two stitches and remove the stitch from the next edge stitch. Look, our last two stitches were removing a loop from the front side on the right side, we also removed a loop from the cream edge loop on the opposite side. Here too, Ladies , I am entering the cream edge loop . I continue like this. We will knit our last two stitches until the last two stitches remain on the front. Here, we will remove loops from the green edge loop place. Look like this, our edge loop places are here, we will enter these places respectively and remove stitches. The back of my booties will be done in this way . We will continue, now let’s complete the back of my booties as I described to you. Let’s go. Yes, ladies , I have knitted the heel part of my booties up to the last edge stitches and now we will do the cutting process. Ladies , we will cut the stitches by collecting them two by two. If you wish, you can also cut them with a crochet hook. Ladies, whichever is easier for you. Look like this . You can also cut easily with a crochet hook. Let’s not cut too tightly. Again, let’s have a slightly flexible cut. Since my booties are on the throat side, there will be some flexibility. My booties will fit comfortably on our feet. In this way, I collect the stitches two by two and make my cut . I’m going to sink like this with the single needle method. I made the edge lace with single needle on the edge of the booties. It consists of two rows. The first row we will use our cream thread again. Ladies, look at the edge stitch instead of the single needle method. I make my single needle without pulling the chain. Let’s do it so that the throat part of my booties does not lose its flexibility. In this way, instead of the next edge stitch, we create my single needle by inserting it into both wings of the loop. We will make all our stitches in order like this . I have made my single crochet. Ladies, now I am pulling a chain here and cutting my thread. I am hiding my thread by passing it through the back loops in this way to create an ugly appearance at the back. Now we will make our 2 rows. Ladies, I will immediately take my green thread. I will go with my green thread. The second row of my single crochet. First of all, with my green thread . I will create a loop , I created a loop like this. First, we will go into the single needle from where we finished , and go back to our stitch. Look, I enter the cream single needle in the back with my hook like this, I take out a loop from here with my green thread and collect the stitches on my hook, I go into the single needle in the back, I removed a loop from here. I’m picking up the stitches on my knitting in this way. In our second row, we’re doing the purl single crochet method, so we’re going backwards. Ladies, look, I went into the single crochet in the back, I took out a stitch with my green thread, and I’m crocheting, so I ‘m gathering the two stitches, purl crocheting. We’re doing the crocheting in this way, too. Ladies, this looks great on booties, too. style edge lace, I’m doing my single crochet by going backwards like this. Look, I dipped back, I took out a stitch, I’m collecting the stitches on my crochet, this is how we look. Ladies, now it’s like this, all the way to where we first started. Let’s go around the edge of my booties. Let’s go. Yes, ladies, I finished my green edge lace. I finished one stitch here last. I will pull a chain and cut my green thread and hide the end of my green thread right behind, passing it through the loops. These thread ends will create an ugly appearance. My other threads in my booties will pass the ends through the loops in this way and hide them beautifully. Ladies, let my booties look clean inside and out. Yes, ladies, my booties are finished with stockings . Considering the model, it is very flexible and hugs the foot immediately. I also want to put it on my model foot. Let’s see our model on our feet. It’s a flexible model. Ladies stand very comfortably. It’s a really nice and stylish model. I think it’s a good idea for women who don’t know how to make booties. Yes, my booties are nice. I put them on our feet. Let’s see, here are my booties. Ladies, as you can see, our model that we have made together from start to finish, our sole, the heel part and the front part of our booties are like this. Yes, ladies, we have come to the end of another beautiful model together. I hope it was a useful and pleasant video for you. Hope to meet you in new videos with new models. Goodbye for now. Stay safe.