Bu Yazımızda Neler Var :
PATTERN SPECIFICS
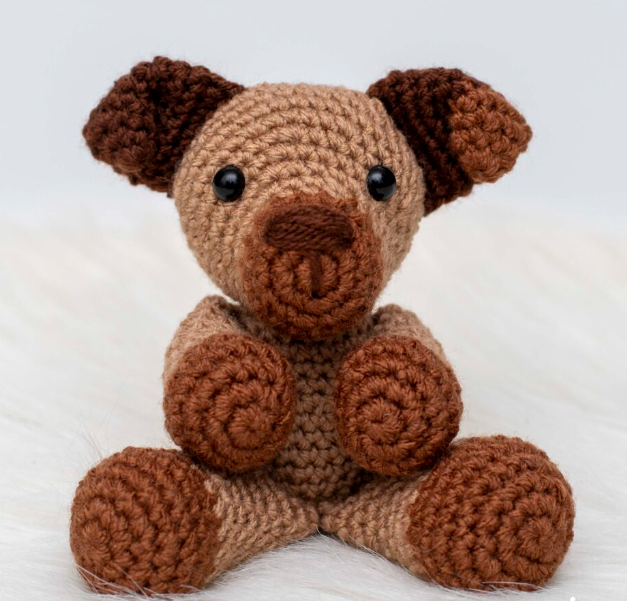
Measurements: Approximately 5” tall (sitting) or 7” tall (standing)
Gauge: Not necessary for this pattern; see notes
Hook Size: 4.0mm (G) crochet hook
Other Tools: tapestry needle, stitch markers, scissors
Yarn Weight: Medium (4) Worsted Weight
Yarn Used: WeCrochet/Knit Picks Brava Worsted
Yardage: color A (light brown): 60 yds, color B (medium brown): 31 yds, color C (dark brown): 9 yds
Other Materials: poly-fil stuffing, 9mm safety eyes
ABBREVIATIONS
st = stitch
sl st = slip stitch
ch = chain
SC = single crochet
SC2tog = single crochet 2 stitches together (invisible decrease is recommended)
SPECIAL STITCHES
SC2tog (using invisible decrease method): Insert hook into front loop of the first stitch. Insert hook into front loop of second stitch. Yarn over. Draw through the first two loops on hook. Yarn over. Draw through both loops on hook.
NOTES
- Checking your gauge is not required for this pattern. Use a hook that is smaller than the size recommended for your yarn weight. This will ensure that your stuffing will not show through the stitches.
- All pieces are worked in the round. Use a stitch marker to indicate the beginning of each round.
- Invisible decreases are recommended. Please see “Special Stitches”.
- Safety eyes and noses pose a choking risk for babies; therefore, if making this toy for a baby, I recommend using yarn, felt, or embroidered details.
- Body, head, legs, arms, and tail require stuffing. Stuff each piece as you work to ensure the piece is completely filled. Do not add stuffing to the ears.
- See tutorial photos.
PATTERN
Using 4.0mm (G) crochet hook:
Body
Using color A (shown as light brown):
R1: Begin with 6 SC in a magic ring. (6 sts)
R2: 2 SC in each st around. (12 sts)
R3: *2 SC in next st, 1 SC in next st. Repeat from * around. (18 sts)
R4: *2 SC in next st, 1 SC in each of the next 2 sts. Repeat from * around. (24 sts)
R5: *2 SC in next st, 1 SC in each of the next 3 sts. Repeat from * around. (30 sts)
R6-11: 1 SC in each st around. (30 sts)
R12: *SC2tog, 1 SC in each of the next 3 sts. Repeat from * around. (24 sts)
R13-15: 1 SC in each st around. (24 sts)
R16: *SC2tog, 1 SC in each of the next 2 sts. Repeat from * around. (18 sts)
Cut yarn, leaving long strand for sewing. Fasten off.
Fill with stuffing.
Head
Using color B (shown as medium brown):
R1: Begin with 6 SC in a magic ring. (6 sts)
R2: 2 SC in each st around. (12 sts)
R3: *2 SC in next st, 1 SC in next st. Repeat from * around. (18 sts)
R4-5: 1 SC in each st around. (18 sts)
Using color A (shown as light brown):
R6: 1 SC in each st around. (18 sts)
R7: *2 SC in next st, 1 SC in each of the next 2 sts. Repeat from * an additional 2 times. 1 SC in each of the next 9 sts around. (21 sts)
R8: *2 SC in next st, 1 SC in each of the next 3 sts. Repeat from * an additional 2 times. 1 SC in each of the next 9 sts around. (24 sts)
R9: *2 SC in next st, 1 SC in each of the next 4 sts. Repeat from * an additional 2 times. 1 SC in each of the next 9 sts around. (27 sts)
R10: *2 SC in next st, 1 SC in each of the next 5 sts. Repeat from * an additional 2 times. 1 SC in each of the next 9 sts around. (30 sts)
R11: *2 SC in next st, 1 SC in each of the next 4 sts. Repeat from * an additional 2 times. Add a st marker to the last worked st. **2 SC in next st, 1 SC in each of the next 4 sts. Repeat from ** an additional 2 times. (36 sts)
The added st marker, and the st marker at the beginning of this round helps to indicate the front sides of the face. The first sequence of sts between the first and second st markers indicates the top of the head. The second sequence of sts between the second and first st markers indicates the bottom of the head. If using safety eyes, insert eyes between R8 and R9, with 7 sts between. You can now remove your second st marker.
R12-15: 1 SC in each st around. (36 sts)
R16: *SC2tog, 1 SC in each of the next 4 sts. Repeat from * around. (30 sts)
R17: *SC2tog, 1 SC in each of the next 3 sts. Repeat from * around. (24 sts)
R18: 1 SC in each st around. (24 sts)
R19: *SC2tog, 1 SC in each of the next 2 sts. Repeat from * around. (18 sts)
Fill head with stuffing.
R20: *SC2tog, 1 SC in next st. Repeat from * around. (12 sts)
R21: *SC2tog. Repeat from * around. (6 sts)
Cut yarn, weave yarn in and out of remaining sts. Pull tight to close. Tie off and weave in ends.
Ear 1
Using color C (shown as dark brown):
R1: Begin with 6 SC in a magic ring. (6 sts)
R2: 1 SC in each st around. (6 sts)
R3: *2 SC in next st, 1 SC in next st. Repeat from * around. (9 sts)
R4: 1 SC in each st around. (9 sts)
R5: *2 SC in next st, 1 SC in each of the next 2 sts. Repeat from * around. (12 sts)
R6: 1 SC in each st around. (12 sts)
R7: *2 SC in next st, 1 SC in each of the next 3 sts. Repeat from * around. (15 sts)
R8-9: 1 SC in each st around. (15 sts)
R10: Fold the ear closed. Leaving the last st of the prior round unworked, working through both sides, 1 SC in each st across. (7 sts)
Cut yarn, leaving long strand for sewing. Fasten off.
Ear 2
Using color B (shown as medium brown):
R1: Begin with 6 SC in a magic ring. (6 sts)
R2: 1 SC in each st around. (6 sts)
R3: *2 SC in next st, 1 SC in next st. Repeat from * around. (9 sts)
R4: 1 SC in each st around. (9 sts)
Using color C (shown as dark brown):
R5: *2 SC in next st, 1 SC in each of the next 2 sts. Repeat from * around. (12 sts)
R6: 1 SC in each st around. (12 sts)
R7: *2 SC in next st, 1 SC in each of the next 3 sts. Repeat from * around. (15 sts)
R8-9: 1 SC in each st around. (15 sts)
R10: Fold the ear closed. Leaving the last st of the prior round unworked, working through both sides, 1 SC in each st across. (7 sts)
Cut yarn, leaving long strand for sewing. Fasten off.
Legs (Make 2)
Using color B (shown as medium brown):
R1: Begin with 6 SC in a magic ring. (6 sts)
R2: 2 SC in each st around. (12 sts)
R3: *2 SC in next st, 1 SC in next st. Repeat from * around. (18 sts)
R4: *2 SC in next st, 1 SC in each of the next 2 sts. Repeat from * around. (24 sts)
R5-6: 1 SC in each st around. (24 sts)
R7: *SC2tog, 1 SC in each of the next 2 sts. Repeat from * around. (18 sts)
Using color A (shown as light brown):
R8-9: 1 SC in each st around. (18 sts)
R10: *SC2tog, 1 SC in each of the next 7 sts. Repeat from * around. (16 sts)
R11-15: 1 SC in each st around. (16 sts)
Fill with stuffing.
R16: Fold the leg closed. Working through both sides, 1 SC in each st across, leaving 1 unworked st on each side. (7 sts)
Cut yarn, leaving long strand for sewing.
Arms (Make 2)
Using color B (shown as medium brown):
R1: Begin with 6 SC in a magic ring. (6 sts)
R2: 2 SC in each st around. (12 sts)
R3: *2 SC in next st, 1 SC in next st. Repeat from * around. (18 sts)
R4-5: 1 SC in each st around. (18 sts)
R6: *SC2tog, 1 SC in next st. Repeat from * around. (12 sts)
Using color A (shown as light brown):
R7-13: 1 SC in each st around. (12 sts)
Fill with stuffing.
R14: Fold the arm closed. Working through both sides, 1 SC in each st across, leaving 1 unworked st on each side. See tutorial photos. (5 sts)
Cut yarn, leaving long strand for sewing.
R14: Fold the arm closed. Working through both sides, 1 SC in each st across, leaving 1 unworked st on each side. See tutorial photos. (5 sts)
Cut yarn, leaving long strand for sewing.
R1: Begin with 4 SC in a magic ring. (4 sts)
R2-3: 1 SC in each st around. (4 sts)
Using color A (shown as light brown):
R4: 2 SC in next st, 1 SC in next st. Repeat from * around. (6 sts)
R5-8: 1 SC in each st around. (6 sts)
R9: *2 SC in next st, 1 SC in next st. Repeat from * around. (9 sts)
R10-11: 1 SC in each st around. (9 sts)
Cut yarn, leaving long strand for sewing. Fasten off.
Lightly fill with stuffing.
ASSEMBLY & FINISHING
Attach each ear to the sides of the head between R14-15 with approximately 5 sts between each.
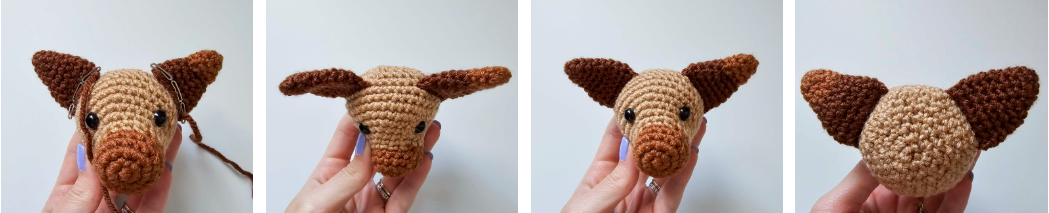
Fold the tips of the ears down. Using a spare piece of yarn with color C, sew ears in the folded position.
Embroider nose over 4 sts of R3 of the head, with a line coming down to R1 on the bottom side of the magic ring.
Attach head to body so that the nose is facing straight out; attaching body to approximately R10-16 of the head.
Attach legs between R5-6 of the body, with the inside of each leg touching in the middle.
Attach arms over R11-15 on each side of the body. At the top of the arms, leave approximately 11 sts between each arm across the front of the body. At the bottom of the arms, leave approximately 16 sts between each arm across the front of the body.
Attach tail over R5-6, on the back of the body.
I hope you enjoyed this free puppy crochet pattern!