Lavender Daisy Gel Manicure: Step-by-Step Tutorial (Natural Nails)
Want this sweet, scattered daisy look on your own nails? This step-by-step guide shows you how to prep, shape, and paint a soft lavender gel manicure with delicate hand-painted daisy accents on natural nails. Keywords: lavender nails tutorial, daisy nail art, gel manicure at home, almond nail shape DIY.
Bu Yazımızda Neler Var :
Welcome to Inspire & Create! 💅
Hi there, lovely reader! We’re so happy to have you back for another nail art tutorial. Today’s design is soft, romantic, and full of springtime charm — a lavender gel manicure scattered with tiny hand-painted daisies. Let’s get started!
Lavender Daisy Gel Manicure: Full Tutorial
What You’ll Need
Materials
- Nail file and buffer
- Cuticle pusher and cuticle nippers
- Nail prep solution (isopropyl alcohol, 70-99%)
- Dehydrator (optional, for extra-clean nail surface)
- Primer (acid-free bonding primer)
- Base coat (gel)
- Pastel lavender gel polish
- White gel polish or acrylic paint (for daisies)
- Yellow gel polish or acrylic paint (daisy centers)
- Fine detail nail art brush
- Small dotting tool
- Top coat (gel)
- UV/LED nail lamp
- Lint-free wipes
- Cuticle oil
Skill level: Beginner to intermediate
Time required: 60-75 minutes
Step 1: Shape Your Natural Nails
- Wash and dry your hands thoroughly
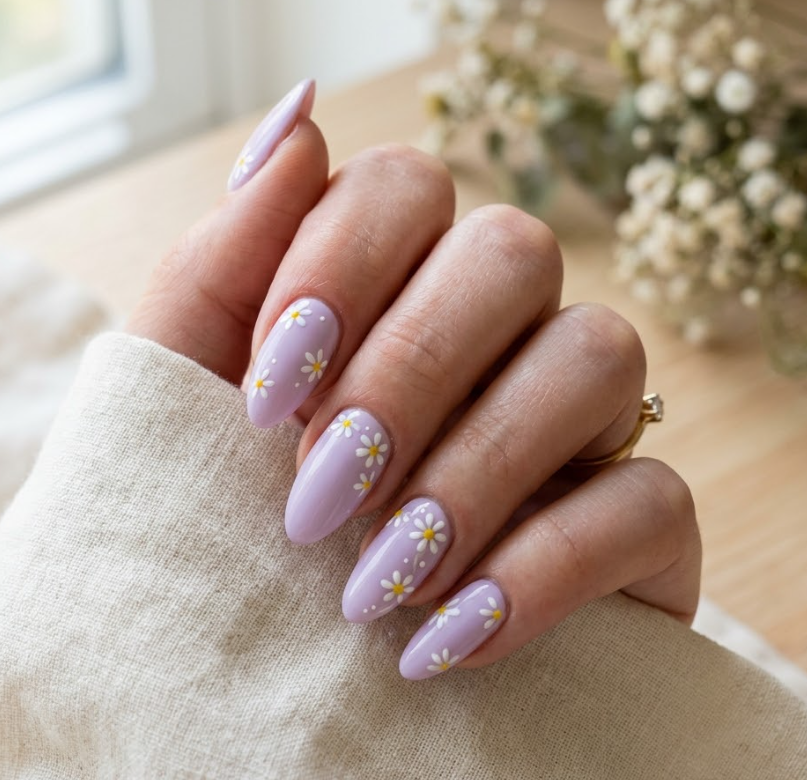
- File each nail into a soft almond shape — round the sides slightly and taper toward a gently pointed (not sharp) tip, following the shape shown in the reference photo
- Buff the surface lightly to smooth any ridges
Step 2: Cuticle Care
- Push back cuticles gently with a cuticle pusher
- Trim only loose, excess cuticle skin with nippers — avoid cutting healthy skin
- Buff the nail surface again lightly to remove shine, which helps with polish adhesion
Step 3: Cleanse and Dehydrate
- Wipe each nail thoroughly with isopropyl alcohol on a lint-free pad to remove oils and dust
- If using a nail dehydrator, apply a small amount and let it air dry for 15-20 seconds — this step helps prevent lifting and extends wear time
Step 4: Apply Primer
- Apply a thin coat of acid-free bonding primer to each nail, avoiding the cuticle and surrounding skin
- Allow to air dry for 30-60 seconds — do not cure this under UV light
Step 5: Apply Base Coat
- Apply a thin, even layer of gel base coat to each nail, making sure to cap the free edge (the tip)
- Cure under the UV/LED lamp for 30-60 seconds
Step 6: Apply Lavender Gel Polish
- Apply a thin, even first coat of pastel lavender gel polish, capping the free edge
- Cure under the UV/LED lamp for 30-60 seconds
- Apply a second coat for full, even opacity — pastel shades typically need two coats for a smooth, opaque finish
- Cure again for 30-60 seconds
Step 7: Plan Your Daisy Placement
Looking at the reference design, the daisies are scattered asymmetrically — some nails have a cluster of 2-3 small daisies near the cuticle or side, while others have just one or two tiny accent flowers. Not every nail needs the same amount.
- Decide which nails will have daisy clusters and which will have just one or two small accents
- Lightly plan placement before painting — daisies generally sit toward one side of the nail rather than dead center, for a natural scattered look
Step 8: Paint the Daisy Petals (White)
- Using a fine detail nail art brush, dip into white gel polish or acrylic paint
- For each daisy, paint 5-6 small oval/teardrop-shaped petals arranged in a circle
- Vary the size of the daisies slightly across the nail for a natural, scattered effect — some larger, some tiny (almost just a dot with small petal strokes)
- Cure under the UV/LED lamp for 30 seconds after completing each hand’s daisies (or after each nail if you prefer more control)
Step 9: Add the Daisy Centers (Yellow)
- Using a small dotting tool, dip into yellow gel polish or acrylic paint
- Place a small dot in the center of each daisy where the petals meet
- For the smallest accent daisies, a tiny yellow dot alone (with minimal or no visible petals) also reads as a flower from a distance — useful for filling in scattered background details
- Cure under the UV/LED lamp for 30 seconds
Step 10: Add Tiny Dot Accents (Optional)
- Using the dotting tool with white or yellow polish, add a few extra tiny single dots scattered near the daisy clusters — this mimics small buds or distant flowers and adds depth to the design
- Cure under the UV/LED lamp for 30 seconds
Step 11: Apply Top Coat
- Once all design elements are complete and fully cured, apply a thin, even layer of glossy top coat over each nail, sealing the free edge
- Cure under the UV/LED lamp for 60 seconds
- Wipe each nail with a lint-free pad and alcohol to remove the tacky layer, revealing a smooth, glossy finish
Step 12: Finishing Touches
- Apply cuticle oil around the nail edges and massage into the surrounding skin
- Wash hands gently to remove any remaining dust or residue
- Admire your soft lavender daisy manicure!
Tips for the Perfect Daisy Manicure
- Keep your detail brush slightly damp (not wet) with polish — too much product makes petals blobby instead of crisp
- Practice the daisy shape on a nail wheel first if you’re new to freehand nail art
- For the asymmetrical look in the reference photo, resist the urge to make every nail match exactly — uneven daisy placement across the set looks more natural and on-trend
- This design pairs beautifully with a glossy finish, but a soft matte top coat also looks lovely for a more muted, velvety effect
Thank you so much for joining us for this lavender daisy nail tutorial! We hope this soft, romantic design brings a little spring joy to your hands. For more step-by-step beauty and craft tutorials, visit us at Inspire & Create | Bringing Imagination to Life. Until next time, happy painting! 🌼💅
Keywords: lavender nails tutorial, daisy nail art, gel manicure at home, almond nail shape DIY, spring nail art, hand-painted nail design, easy nail art for beginners, pastel gel polish