Matte Black Coffin Nails with Gold Geometric Line Art: Step-by-Step Tutorial
Want a bold, art-deco-inspired manicure? This step-by-step guide shows you how to shape, paint, and detail matte black coffin nails with elegant gold geometric line art on natural nails. Keywords: matte black nails tutorial, geometric nail art, gold line nail design, coffin nail shape DIY.
Bu Yazımızda Neler Var :
Welcome to Inspire & Create! 💅
Hi there, lovely reader! We’re so happy to have you back for another nail art tutorial. Today’s design is bold, modern, and absolutely striking — matte black coffin nails with intricate gold geometric line art. Let’s get started!
Matte Black Gold Geometric Nails: Full Tutorial
What You’ll Need
Materials
- Nail file and buffer
- Cuticle pusher and cuticle nippers
- Nail prep solution (isopropyl alcohol, 70-99%)
- Primer (acid-free bonding primer)
- Base coat (gel)
- Black gel polish
- Matte top coat (gel)
- Gold striping gel or gold metallic polish (thin consistency for fine lines)
- Extra-fine detail nail art brush (liner brush, ideally 5/0 or smaller)
- Ruler or striping tape (optional, for straight guide lines)
- Regular glossy top coat (for sealing gold lines only, if desired)
- UV/LED nail lamp
- Lint-free wipes
- Cuticle oil
Skill level: Advanced (precise line work required)
Time required: 75-90 minutes
Step 1: Shape Your Natural Nails into Coffin Shape
- Wash and dry your hands thoroughly
- File each nail into a coffin (ballerina) shape — straight sides tapering slightly inward, with a flat, squared-off tip rather than a point
- This shape requires longer nails, so if your natural nails are short, this design works beautifully with tip extensions or gel/acrylic length added first
- Buff the surface lightly to smooth ridges
Step 2: Cuticle Care
- Push back cuticles gently with a cuticle pusher
- Trim only loose, excess cuticle skin with nippers
- Buff the nail surface again lightly to remove shine
Step 3: Cleanse and Prep
- Wipe each nail thoroughly with isopropyl alcohol on a lint-free pad to remove oils and dust
- Apply a thin coat of acid-free bonding primer to each nail, avoiding the cuticle and skin
- Allow to air dry for 30-60 seconds — do not cure under UV light
Step 4: Apply Base Coat
- Apply a thin, even layer of gel base coat to each nail, capping the free edge
- Cure under the UV/LED lamp for 30-60 seconds
Step 5: Apply Black Gel Polish
- Apply a thin, even first coat of black gel polish, capping the free edge
- Cure under the UV/LED lamp for 30-60 seconds
- Apply a second coat for full, deep opacity — black often needs two coats to avoid a grayish or streaky look
- Cure again for 30-60 seconds
Step 6: Apply Matte Top Coat (Base Layer)
- Apply a thin, even layer of matte top coat over the black polish
- Cure under the UV/LED lamp for 30-60 seconds
- This gives you the soft, velvety matte black base seen in the reference photo — the gold lines will be added on top of this
Step 7: Plan Your Geometric Design
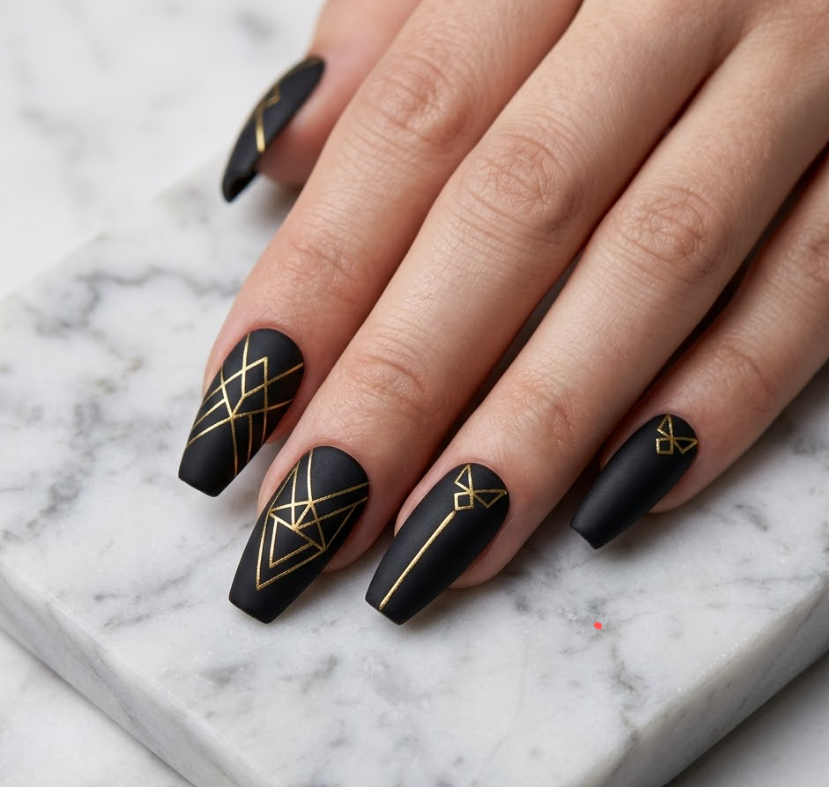
Looking at the reference photo, each nail has a different geometric pattern — there’s no single repeated design. Generally:
- The ring finger (or longest/most prominent nail) often gets the most elaborate design — multiple overlapping triangles and diamond shapes forming a complex faceted pattern
- Other nails get simpler accents — a single diamond outline, a few angular lines crossing near the cuticle, or one bold straight line down the center
- One or two nails can be left mostly plain with just a single thin gold line for contrast and visual rest
Before painting, it can help to lightly sketch your line placement with a fine pencil-style nail art tool, or simply plan mentally which direction each line will go.
Step 8: Paint the Gold Geometric Lines
- Using your extra-fine detail brush, dip into gold striping gel or thin gold metallic polish
- Wipe excess product off the brush on a paper towel until the brush comes to a fine point — this is essential for crisp, thin lines
- Working on one nail at a time, paint your planned geometric lines:
- For triangle/diamond clusters: start with one shape, then add overlapping or nested shapes radiating outward or stacking toward one corner of the nail
- For single straight lines: pull the brush in one smooth, continuous stroke from the cuticle area toward the tip (or vice versa), keeping even pressure for a consistent line width
- For angular crossing lines near the cuticle: paint 2-4 short diagonal lines that intersect at varying angles, creating a faceted “gem” look
- Cure under the UV/LED lamp for 30 seconds after completing the lines on each nail, before moving to the next, to avoid smudging
Step 9: Refine and Add Details
- Once the base lines are cured, go back over any lines that need reinforcing or add small connecting lines between shapes for extra dimension
- For nails with dense geometric clusters, you can add tiny secondary lines branching off the main shapes for a more intricate, faceted appearance
- Cure under the UV/LED lamp for 30 seconds after each round of additions
Step 10: Seal the Design
- If your gold striping gel is matte and you want the lines to have a subtle sheen against the matte black (as seen in the reference), you can apply a small amount of regular glossy top coat with a very fine brush, only over the gold lines themselves
- Cure under the UV/LED lamp for 30-60 seconds
- Alternatively, leave the entire nail matte for a uniform velvety finish — both looks are striking
Step 11: Final Matte Seal (Optional)
- If you applied glossy top coat only to the gold lines, you may want a final very thin layer of matte top coat over the entire nail to even out the texture — apply carefully to avoid dulling the gold too much
- Cure under the UV/LED lamp for 30-60 seconds
Step 12: Finishing Touches
- Apply cuticle oil around the nail edges and massage into the surrounding skin
- Wash hands gently to remove any remaining residue
- Admire your bold matte black and gold geometric coffin nails!
Tips for the Perfect Geometric Design
- This design relies heavily on a steady hand — practice your lines on a nail wheel before committing to the final set
- Thin the gold polish slightly with thinner if it’s dragging or creating thick, uneven lines
- Varying the design slightly nail-to-nail (as in the reference) looks more intentional and editorial than identical repeated patterns
- A small piece of striping tape can help create perfectly straight long lines if freehand feels too difficult — apply, paint over the edge, then remove the tape before curing
Thank you so much for joining us for this dramatic geometric nail tutorial! We hope this matte black and gold design adds a bold, art-deco edge to your nail collection. For more step-by-step beauty and craft tutorials, visit us at Inspire & Create | Bringing Imagination to Life. Until next time, happy painting! ✨💅
Keywords: matte black nails tutorial, geometric nail art, gold line nail design, coffin nail shape DIY, art deco nails, gel manicure at home, advanced nail art tutorial, gold striping gel technique