Glittery Silver Ombre Nails: Step-by-Step Tutorial
Want a sparkling winter manicure? This step-by-step guide shows you how to shape, paint, and create a glittery silver ombre fade from clear to sparkle on natural nails. Keywords: silver glitter nails tutorial, ombre nail art, winter manicure DIY, glitter gradient nails.
Bu Yazımızda Neler Var :
Welcome to Inspire & Create! 💅
Hi there, lovely reader! We’re so happy to have you back for another nail art tutorial. Today’s design is pure winter magic — a glittery silver ombre fade that goes from sheer at the cuticle to sparkling silver at the tips. Let’s get started!
Glittery Silver Ombre Nails: Full Tutorial
What You’ll Need
Materials
- Nail file and buffer
- Cuticle pusher and cuticle nippers
- Nail prep solution (isopropyl alcohol, 70-99%)
- Primer (acid-free bonding primer)
- Base coat (gel)
- Sheer pink or clear “milky” gel polish (base color)
- Silver glitter gel polish (fine and chunky glitter mix works best)
- Makeup sponge (for ombre blending)
- Acetone (for cleaning the sponge between coats)
- Top coat (gel) — thick-formula or “gritty glitter” top coat recommended
- UV/LED nail lamp
- Lint-free wipes
- Cuticle oil
Skill level: Beginner to intermediate
Time required: 60-75 minutes
Step 1: Shape Your Natural Nails
- Wash and dry your hands thoroughly
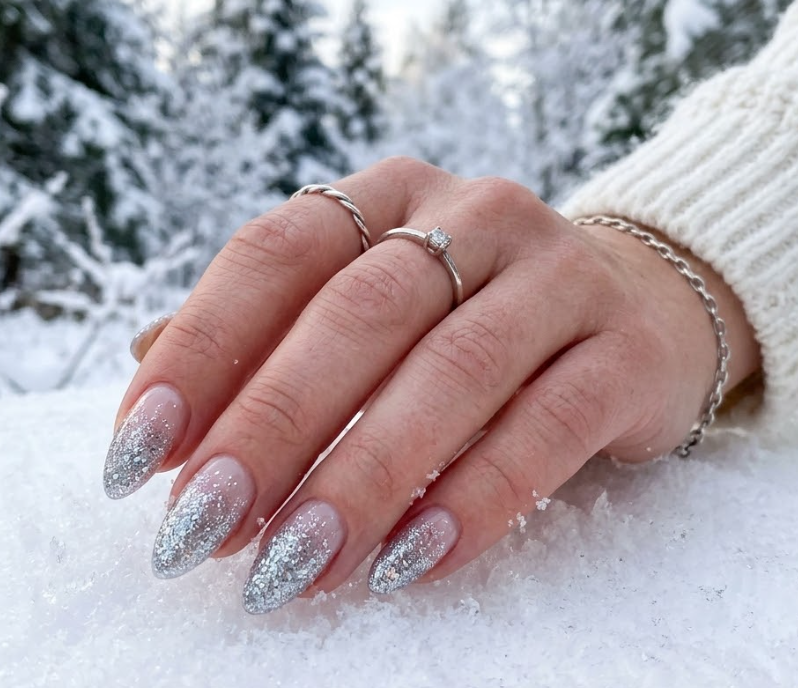
- File each nail into a soft almond/stiletto shape — tapering the sides into a longer, more pointed tip, similar to the reference photo
- This design works well with tip extensions if your natural nails are short, since the length shows off the ombre fade beautifully
- Buff the surface lightly to smooth ridges
Step 2: Cuticle Care
- Push back cuticles gently with a cuticle pusher
- Trim only loose, excess cuticle skin with nippers
- Buff the nail surface again lightly to remove shine
Step 3: Cleanse and Prep
- Wipe each nail thoroughly with isopropyl alcohol on a lint-free pad to remove oils and dust
- Apply a thin coat of acid-free bonding primer to each nail, avoiding the cuticle and skin
- Allow to air dry for 30-60 seconds — do not cure under UV light
Step 4: Apply Base Coat
- Apply a thin, even layer of gel base coat to each nail, capping the free edge
- Cure under the UV/LED lamp for 30-60 seconds
Step 5: Apply Sheer Base Color
- Apply a thin, even coat of sheer pink or “milky” clear gel polish over the entire nail — this creates the soft, natural-looking base that the glitter will fade into
- Cure under the UV/LED lamp for 30-60 seconds
- This base should remain mostly sheer/translucent near the cuticle area, which is why the reference photo shows natural nail visible at the base
Step 6: Prepare for the Glitter Ombre
- Pour a small amount of silver glitter gel polish onto a piece of foil or a palette
- Cut a makeup sponge into a wedge shape for better control near the cuticle line
- Dab the sponge lightly into the glitter polish, then dab it onto the foil a couple of times to remove excess — you want a light, even layer on the sponge, not a thick blob
Step 7: Apply the Glitter Ombre Fade
- Starting about one-third to halfway up the nail (toward the tip), dab the sponge onto the nail in a light, repeated patting motion
- Concentrate more product toward the very tip of the nail, gradually using lighter dabs as you move toward the cuticle area — this creates the fade effect
- The area closest to the cuticle should remain mostly sheer/clear, with glitter density increasing toward the tip
- Repeat this dabbing process 2-3 times, allowing the polish to tack up slightly between applications, until you achieve a rich, sparkly concentration at the tips that fades smoothly toward clear
Step 8: Cure the Glitter Layer
- Cure under the UV/LED lamp for 30-60 seconds
- Check the fade — if the transition looks too harsh or the glitter is too sparse in areas, repeat the sponge dabbing in those spots and cure again
Step 9: Build Up Glitter Density (If Needed)
- For a fuller, more sparkly tip area like in the reference photo, repeat steps 7-8 one more time, focusing the sponge application on the outer third of the nail
- Cure again under the UV/LED lamp for 30-60 seconds
Step 10: Apply Top Coat
- Glitter finishes can feel textured/bumpy, so apply a generous, thick layer of top coat (a “gritty glitter” or thick-formula top coat works best) to fully encapsulate the glitter particles and create a smooth surface
- Cure under the UV/LED lamp for 60 seconds
- If the surface still feels textured, apply a second layer of top coat and cure again
- Wipe each nail with a lint-free pad and alcohol to remove any tacky residue, revealing a smooth, glossy finish
Step 11: Finishing Touches
- Apply cuticle oil around the nail edges and massage into the surrounding skin
- Clean any glitter residue from the sponge or work surface with acetone
- Wash hands gently to remove any remaining dust
- Admire your glittery silver ombre nails — perfect for winter!
Tips for the Perfect Glitter Ombre
- Build the glitter gradually in thin layers rather than trying to achieve full sparkle in one application — this gives you a smoother, more controlled fade
- If the sponge starts picking up too much product, dab it on a paper towel before applying to the nail to control intensity
- A slightly damp sponge (with a drop of top coat mixed into the glitter) can help the glitter adhere more evenly for beginners
- This design photographs beautifully in natural light against light backgrounds (like snow), since the glitter catches and reflects light dramatically
Thank you so much for joining us for this sparkling winter nail tutorial! We hope this glittery silver ombre design adds some seasonal magic to your hands. For more step-by-step beauty and craft tutorials, visit us at Inspire & Create | Bringing Imagination to Life. Until next time, happy painting! ❄️💅
Keywords: silver glitter nails tutorial, ombre nail art, winter manicure DIY, glitter gradient nails, almond stiletto nails, gel polish glitter technique, sparkly nail design, holiday nail art