Soft Pink Butterfly Nails: Step-by-Step Tutorial
Want a delicate, romantic manicure? This step-by-step guide shows you how to shape, paint, and apply butterfly decals on a soft pink glossy base for natural nails. Keywords: pink nails tutorial, butterfly nail decals, gel manicure at home, square nail shape DIY.
Bu Yazımızda Neler Var :
Welcome to Inspire & Create! 💅
Hi there, lovely reader! We’re so happy to have you back for another nail art tutorial. Today’s design is soft, feminine, and full of charm — a glossy pink manicure with delicate butterfly decals and tiny glitter accents. Let’s get started!
Soft Pink Butterfly Nails: Full Tutorial
What You’ll Need
Materials
- Nail file and buffer
- Cuticle pusher and cuticle nippers
- Nail prep solution (isopropyl alcohol, 70-99%)
- Primer (acid-free bonding primer)
- Base coat (gel)
- Soft pink gel polish
- Butterfly nail decals/stickers (water-slide or adhesive type)
- Tweezers (for placing decals)
- Fine glitter (loose, white or iridescent) or white dotting polish (for small dot accents)
- Small dotting tool
- Top coat (gel)
- UV/LED nail lamp
- Lint-free wipes
- Cuticle oil
- Small bowl of water (if using water-slide decals)
Skill level: Beginner-friendly
Time required: 50-60 minutes
Step 1: Shape Your Natural Nails
- Wash and dry your hands thoroughly
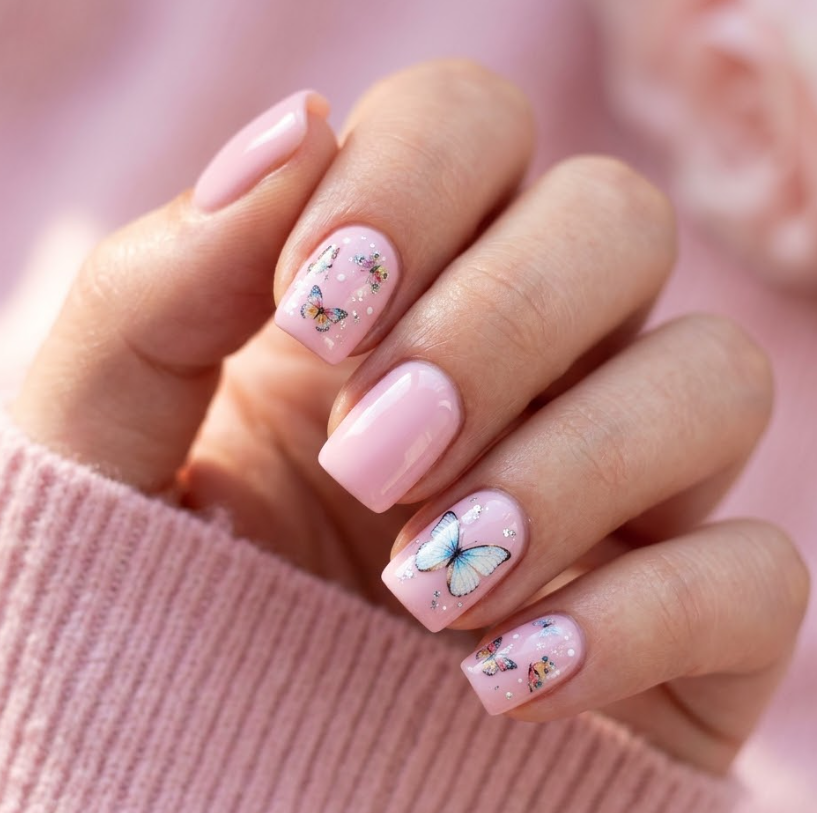
- File each nail into a soft square shape — straight sides with gently rounded corners, and a flat free edge, as shown in the reference photo
- Buff the surface lightly to smooth ridges
Step 2: Cuticle Care
- Push back cuticles gently with a cuticle pusher
- Trim only loose, excess cuticle skin with nippers
- Buff the nail surface again lightly to remove shine
Step 3: Cleanse and Prep
- Wipe each nail thoroughly with isopropyl alcohol on a lint-free pad to remove oils and dust
- Apply a thin coat of acid-free bonding primer to each nail, avoiding the cuticle and skin
- Allow to air dry for 30-60 seconds — do not cure under UV light
Step 4: Apply Base Coat
- Apply a thin, even layer of gel base coat to each nail, capping the free edge
- Cure under the UV/LED lamp for 30-60 seconds
Step 5: Apply Soft Pink Gel Polish
- Apply a thin, even first coat of soft pink gel polish, capping the free edge
- Cure under the UV/LED lamp for 30-60 seconds
- Apply a second coat for full, even opacity and that signature glossy “milk bath” finish
- Cure again for 30-60 seconds
Step 6: Plan Your Butterfly Placement
Looking at the reference photo, not every nail has a butterfly — typically 2-3 accent nails per hand feature a butterfly decal, while the remaining nails stay plain pink with just a few scattered glitter dots. A common placement is the ring finger and one or two others, positioned slightly off-center for a natural look.
Step 7: Apply Butterfly Decals
- If using water-slide decals: trim around the butterfly design with small scissors, soak in water for 20-30 seconds until the decal slides off the backing paper, then gently slide it onto the nail using tweezers, positioning it slightly off-center
- If using adhesive/sticker decals: peel the decal from its backing with tweezers and press directly onto the cured pink base, smoothing out any air bubbles with the tweezers or a soft tool
- Gently pat the decal down to ensure full contact with the nail surface, removing any excess water or air bubbles
Step 8: Seal the Decals (First Layer)
- Apply a thin layer of top coat directly over the decal to seal it in place and prevent peeling
- Cure under the UV/LED lamp for 30-60 seconds
- This locks the decal flat against the nail before adding any additional details
Step 9: Add Glitter Dot Accents
- Using a small dotting tool, dip into white dotting polish or pick up a small amount of fine loose glitter with a slightly tacky dotting tool
- Add small scattered dots around the butterfly decals — a cluster of varying-sized dots near each butterfly mimics floating sparkle or flower petals
- For plain nails (without butterflies), add a few scattered dots as well for cohesion across the whole set
- Cure under the UV/LED lamp for 30 seconds if using gel-based dotting polish
Step 10: Apply Final Top Coat
- Apply a final, even layer of glossy top coat over all nails, sealing the free edge
- Cure under the UV/LED lamp for 60 seconds
- Wipe each nail with a lint-free pad and alcohol to remove any tacky residue, revealing a high-shine, glass-like finish
Step 11: Finishing Touches
- Apply cuticle oil around the nail edges and massage into the surrounding skin
- Wash hands gently to remove any remaining residue
- Admire your soft pink butterfly nails!
Tips for the Perfect Butterfly Manicure
- Position butterflies at a slight angle rather than perfectly centered — this creates a more natural, “fluttering” look as seen in the reference
- If a decal tears or wrinkles during application, gently smooth it with a soft brush dipped in top coat before curing — this can often fix small imperfections
- Mixing 2-3 different butterfly designs/colors across the set (rather than identical decals) adds visual interest
- This design works beautifully for spring, weddings, or any occasion calling for a soft, romantic look
Thank you so much for joining us for this delicate butterfly nail tutorial! We hope this soft pink design brings a touch of whimsy and romance to your hands. For more step-by-step beauty and craft tutorials, visit us at Inspire & Create | Bringing Imagination to Life. Until next time, happy painting! 🦋💅
Keywords: pink nails tutorial, butterfly nail decals, gel manicure at home, square nail shape DIY, romantic nail art, glossy gel polish, spring nail design, glitter accent nails