Cozy Amigurumi Hedgehog: Free Crochet Pattern with Autumn Leaves
Bu Yazımızda Neler Var :
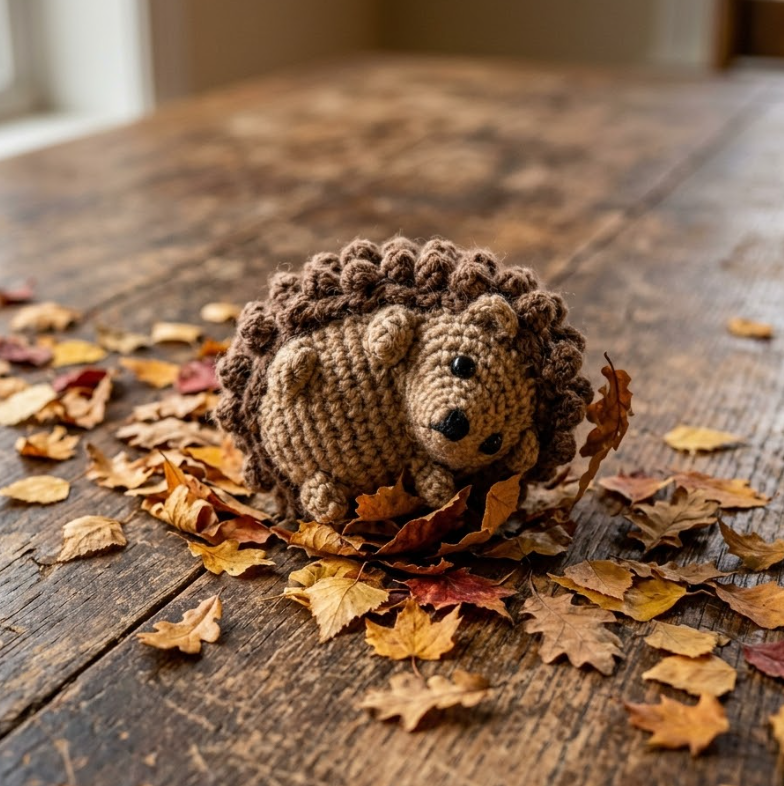
Cozy Amigurumi Hedgehog: Free Crochet Pattern with Autumn Leaves
Crochet your own adorable amigurumi hedgehog with this free step-by-step pattern! Featuring a textured spiky back and a sweet little face, this pattern is perfect for fall-themed gifts and home decor. Keywords: amigurumi hedgehog pattern, free crochet hedgehog, autumn amigurumi, crochet hedgehog for beginners.
Welcome to Inspire & Create! 🧶
Hello again, cozy maker! We’re so happy to have you back for another delightful project. Today’s creation is full of charm — a tiny hedgehog with the cutest textured spikes, perfect for celebrating the autumn season. Let’s get hooking!
How to Crochet an Amigurumi Hedgehog: Step-by-Step Pattern
What You’ll Need
Materials
- Brown or tan yarn (body, spikes)
- Cream/beige yarn (face, belly)
- Black yarn (nose)
- 3.5mm crochet hook
- Polyester fiberfill stuffing
- Safety eyes
- Yarn needle
- Pink embroidery thread (cheeks, optional)
Skill level: Beginner-friendly
Finished size: Approximately 4 inches long
Step 1: Crochet the Body (Cream Yarn Base)
- Round 1: 6 sc in magic ring (6)
- Round 2: inc in each st (12)
- Round 3: sc, inc repeat (18)
- Round 4: sc 2, inc repeat (24)
- Round 5: sc 3, inc repeat (30)
- Round 6: sc 4, inc repeat (36)
- Rounds 7-9: sc around (36) — 3 rounds even
- Insert safety eyes around round 8, spaced 9-10 sts apart, positioned toward the front (this will be the face area)
- Rounds 10-14: sc around (36) — 5 rounds even
- Round 15: sc 4, dec repeat (30)
- Round 16: sc 3, dec repeat (24)
- Round 17: sc 2, dec repeat (18)
- Stuff firmly as you go
- Round 18: sc, dec repeat (12)
- Round 19: dec around (6)
- Fasten off, close hole
Step 2: Crochet the Face Patch (Cream Yarn)
- Ch 2, work a small oval in rows: 3 sc in 2nd ch from hook, inc each end every other row up to about 10 sts wide, work even for 2-3 rows, then dec back to a point
- Sew onto the front of the body, framing the safety eyes
- Embroider a small black triangle nose at the tip of the face patch
Step 3: Crochet the Spikes (Brown Yarn — Surface Crochet Loop Stitch)
This step is what gives your hedgehog that signature spiky texture!
- With brown yarn, starting at the back of the head and working toward the tail, insert your hook into a stitch on the body
- Pull up a loop, then wrap the yarn around two fingers to create a loop of about 1 inch, insert hook back into the same stitch and pull through, securing the loop
- Repeat this loop stitch in every stitch (or every other stitch for a less dense look) across the entire top and sides of the body, leaving the cream face/belly area free of spikes
- Work in rows from the head toward the tail, covering the back and sides completely
Step 4: Crochet the Ears (Brown Yarn, Make 2)
- Round 1: 6 sc in magic ring (6)
- Round 2: inc around (12)
- Flatten and sc closed
- Sew to the top of the head, just behind the face patch, before adding spikes in that area (or tuck spikes around them after)
Step 5: Crochet the Feet (Cream Yarn, Make 4)
- Round 1: 5 sc in magic ring (5)
- Rounds 2-3: sc around (5) — 2 rounds
- Flatten and sc closed
- Sew two feet to the front underside and two to the back underside of the body so the hedgehog sits flat
Step 6: Finishing Touches
- Trim the spike loops evenly with small scissors for a neat, fluffy texture — or leave them as loops for a more whimsical look
- Embroider small pink cheeks below the eyes with embroidery thread, if desired
- Weave in all loose ends
Tips for the Perfect Amigurumi Hedgehog
- The loop stitch can take practice — work slowly and keep your loops a consistent size for an even, textured look
- For a two-tone spiky effect, alternate between two shades of brown yarn every couple of rows
- This pattern makes an excellent stash-buster project since the spikes use up small amounts of yarn quickly
Thank you so much for crafting this cozy little hedgehog with us today! We hope it brings warmth and charm to your autumn decor or makes the perfect handmade gift. For more free patterns and creative inspiration, visit us at Inspire & Create | Bringing Imagination to Life. Happy hooking, and see you in the next tutorial! 🦔🍂