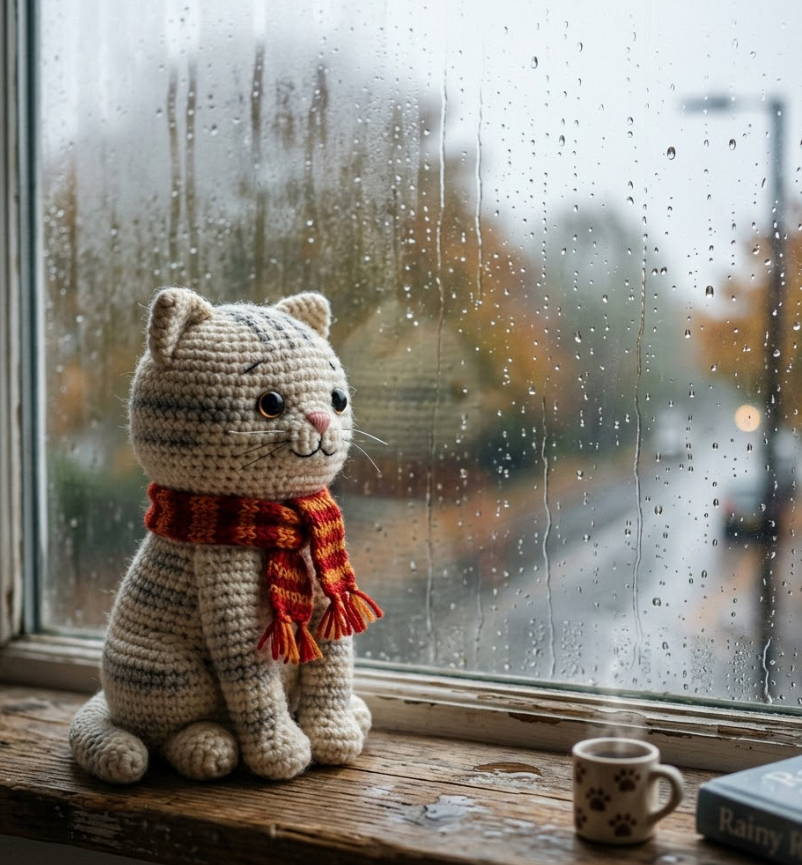
Adorable Amigurumi Cat: Free Crochet Pattern with a Cozy Scarf
Crochet your own amigurumi cat with this free step-by-step pattern! This pattern shows how to make a sweet little cat figure wearing a tiny scarf — perfect for home decor or a thoughtful handmade gift. Keywords: amigurumi cat pattern, free crochet cat, cat with scarf amigurumi, beginner amigurumi pattern.
Bu Yazımızda Neler Var :
Welcome to Inspire & Create! 🧶
Hello again, dear maker! We’re so happy to have you back for another cozy project. Today’s creation is extra sweet — a little cat sitting by a foggy window, wearing its very own tiny scarf. Let’s get hooking!
How to Crochet an Amigurumi Cat: Step-by-Step Pattern
What You’ll Need
Materials
- Gray or brown yarn (body, head, tail)
- White or cream yarn (chest, paw tips, face detail)
- Pink yarn (inner ears, cheeks)
- Colorful yarn for the scarf (red, yellow, blue, etc.)
- 3.5mm crochet hook
- Polyester fiberfill stuffing
- Safety eyes
- Yarn needle
- Black embroidery thread (nose, mouth)
Skill level: Beginner to intermediate
Finished size: Approximately 5 inches tall
Step 1: Crochet the Head (Gray/Brown Yarn)
- Round 1: 6 sc in magic ring (6)
- Round 2: inc in each st (12)
- Round 3: sc, inc repeat (18)
- Round 4: sc 2, inc repeat (24)
- Round 5: sc 3, inc repeat (30)
- Rounds 6-10: sc around (30) — 5 rounds even
- Insert safety eyes around round 7, spaced 7-8 sts apart
- Round 11: sc 3, dec repeat (24)
- Round 12: sc 2, dec repeat (18)
- Stuff firmly
- Round 13: sc, dec repeat (12)
- Round 14: dec around (6)
- Fasten off, close hole
Step 2: Crochet the Ears (Gray/Brown Yarn, Make 2)
- Round 1: 6 sc in magic ring (6)
- Round 2: inc around (12)
- Round 3: sc around (12)
- Flatten into a triangle shape and sc across to close
- Sew a small pink felt or embroidered triangle inside each ear
- Sew ears to the top of the head, angled slightly outward
Step 3: Crochet the Body (Gray/Brown Yarn with White Chest)
- Round 1: 6 sc in magic ring (6)
- Round 2: inc around (12)
- Round 3: sc, inc repeat (18)
- Round 4: sc 2, inc repeat (24)
- Rounds 5-11: sc around (24) — 7 rounds even
- Round 12: sc 2, dec repeat (18)
- Stuff firmly
- Round 13: sc, dec repeat (12)
- Round 14: dec around (6)
- Fasten off, close hole, sew to head
Step 4: Add the White Chest Patch
- Ch 2, work an oval shape in rows: 3 sc in 2nd ch from hook, inc each end every other row up to about 10 sts wide, work even for 2-3 rows, then dec back to a point
- Sew onto the front of the body from the chin down to the belly
Step 5: Crochet the Arms (Gray/Brown Yarn, Make 2)
- Round 1: 6 sc in magic ring (6)
- Rounds 2-6: sc around (6) — 5 rounds
- Stuff lightly, flatten and sc closed
- Optional: sc the last round in white for a “paw tip” effect
- Sew to sides of body
Step 6: Crochet the Legs (Gray/Brown Yarn, Make 2)
- Round 1: 6 sc in magic ring (6)
- Round 2: inc around (12)
- Rounds 3-7: sc around (12) — 5 rounds
- Stuff firmly, flatten and sc closed
- Optional: sc the last round in white for a “paw tip” effect
- Sew to bottom of body so the cat can sit
Step 7: Crochet the Tail (Gray/Brown Yarn)
- Round 1: 6 sc in magic ring (6)
- Rounds 2-10: sc around (6) — 9 rounds
- Stuff lightly, sc closed
- Sew to the back of the body, curling it gently around one side
Step 8: Crochet the Scarf (Colorful Yarn)
- Ch 30 (or longer/shorter depending on desired length)
- Row 1: sc in 2nd ch from hook and in each ch across
- Rows 2-3: ch 1, turn, sc across
- Fasten off, leaving long tails at each end
- Add fringe by cutting short strands of yarn and attaching them to both ends using the fringe/latch-hook technique
- Wrap the scarf around the cat’s neck and tie loosely, or tack in place with a few small stitches
Step 9: Finishing Touches
- Embroider a small pink nose and mouth with embroidery thread
- Add pink cheek circles with embroidery thread for extra cuteness
- Weave in all loose ends
Tips for the Perfect Amigurumi Cat
- For a sleepy expression, position the safety eyes slightly closer together and lower on the face
- Try different scarf colors and patterns (stripes, color-blocking) to match your home decor or the recipient’s style
- This pattern can easily be adapted into other animals by changing the ear shape — rounded ears for a bear, long ears for a dog
Thank you so much for crafting this cozy little cat with us today! We hope it brings warmth and charm to your shelf, especially on chilly, foggy days. For more free patterns and creative inspiration, visit us at Inspire & Create | Bringing Imagination to Life. Happy hooking, and see you in the next tutorial! 🐱🧣