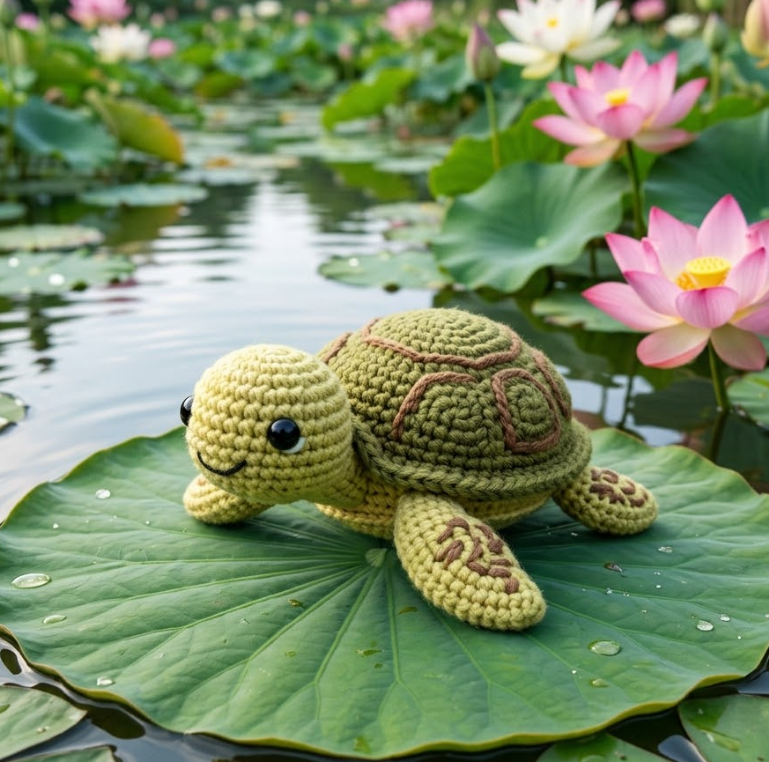
Serene Amigurumi Turtle: Free Crochet Pattern with Lily Pad
Crochet your own peaceful amigurumi turtle with this free step-by-step pattern! Featuring a textured shell and a matching lily pad, this pattern is perfect for nature-themed decor and gifts. Keywords: amigurumi turtle pattern, free crochet turtle, lily pad amigurumi, nature crochet pattern.
Bu Yazımızda Neler Var :
Welcome to Inspire & Create! 🧶
Hello again, peaceful maker! We’re so happy to have you back for another relaxing project. Today’s creation brings a touch of calm pond charm — a sweet little turtle resting on its own lily pad. Let’s get hooking!
How to Crochet an Amigurumi Turtle: Step-by-Step Pattern
What You’ll Need
Materials
- Green yarn (head, legs, tail)
- Darker green or teal yarn (shell)
- Cream or yellow yarn (shell pattern detail)
- Pink yarn (lotus flower, optional)
- 3.5mm crochet hook
- Polyester fiberfill stuffing
- Safety eyes (small size)
- Yarn needle
- Cardboard or plastic canvas circle (optional, for flat shell base)
Skill level: Beginner-friendly
Finished size: Approximately 4 inches long
Step 1: Crochet the Head (Green Yarn)
- Round 1: 6 sc in magic ring (6)
- Round 2: inc in each st (12)
- Round 3: sc, inc repeat (18)
- Rounds 4-6: sc around (18) — 3 rounds even
- Insert safety eyes around round 4, spaced 6-7 sts apart
- Round 7: sc, dec repeat (12)
- Stuff firmly
- Round 8: dec around (6)
- Fasten off, leave open for sewing to body
Step 2: Crochet the Body/Underside (Green Yarn)
- Round 1: 6 sc in magic ring (6)
- Round 2: inc around (12)
- Round 3: sc, inc repeat (18)
- Round 4: sc 2, inc repeat (24)
- Round 5: sc 3, inc repeat (30)
- Rounds 6-9: sc around (30) — 4 rounds even
- Stuff lightly, fasten off (this forms a dome shape that the shell will sit on top of)
Step 3: Crochet the Shell (Darker Green/Teal Yarn)
- Round 1: 6 sc in magic ring (6)
- Round 2: inc around (12)
- Round 3: sc, inc repeat (18)
- Round 4: sc 2, inc repeat (24)
- Round 5: sc 3, inc repeat (30)
- Round 6: sc 4, inc repeat (36)
- Round 7: sc around (36)
- Fasten off — this forms a flat-ish dome that will sit on top of the body as the shell
Step 4: Add Shell Pattern (Cream/Yellow Yarn)
- With contrasting yarn, work surface crochet lines in a hexagonal or honeycomb pattern across the shell — create a center point and work spokes outward to the edge, then connect them with curved lines for a classic tortoise shell texture
- Alternatively, embroider simple hexagon outlines across the shell surface with backstitch for an easier option
Step 5: Crochet the Legs (Green Yarn, Make 4)
- Round 1: 6 sc in magic ring (6)
- Round 2: inc around (12)
- Rounds 3-4: sc around (12) — 2 rounds
- Flatten slightly and sc closed (don’t overstuff — legs should be somewhat flat for a “tucked under shell” look)
- Sew two legs to the front and two to the back, positioned to peek out from under the shell
Step 6: Crochet the Tail (Green Yarn)
- Round 1: 5 sc in magic ring (5)
- Rounds 2-3: sc around (5) — 2 rounds
- Flatten and sc closed
- Sew to the back of the body, between the back legs
Step 7: Assembly
- Sew the head to the front of the body
- Place the shell on top of the body and sew around the edges, leaving the head, legs, and tail visible around the perimeter
- For a sturdier, flatter shell, cut a circle of cardboard or plastic canvas and insert it between the body and shell before sewing closed
Step 8: Make the Lily Pad (Green Yarn)
- Round 1: 6 sc in magic ring (6)
- Round 2: inc around (12)
- Round 3: sc, inc repeat (18)
- Round 4: sc 2, inc repeat (24)
- Round 5: sc 3, inc repeat (30)
- Round 6: sc 4, inc repeat (36)
- Round 7: sc around (36)
- Fasten off — leave mostly flat, this is the lily pad
- Optional: with a separate strand, work a small slit or notch from the edge toward the center (the classic lily pad “wedge” shape) by skipping a few stitches and working a straight seam
Step 9: Make the Lotus Flower (Pink Yarn, Optional)
- Round 1: ch 2, work 10 sc into a magic ring
- Round 2: ch 3, skip 1 sc, sl st in next sc repeat around — creates petal loops
- Fasten off, sew to one side of the lily pad
Step 10: Finishing Touches
- Weave in all loose ends
- Place the turtle on top of the lily pad and tack lightly in place if desired (or leave loose for repositioning)
- Gently shape the legs so the turtle sits stably
Tips for the Perfect Amigurumi Turtle
- Two-tone shells (alternating between two shades of green) add extra visual interest to the honeycomb pattern
- This pattern can easily be made in miniature as a keychain or magnet by reducing all stitch counts proportionally
- Pair with a small crochet frog or dragonfly for a complete pond-themed display
Thank you so much for crafting this peaceful little turtle with us today! We hope it brings a calm, natural touch to your space. For more free patterns and creative inspiration, visit us at Inspire & Create | Bringing Imagination to Life. Happy hooking, and see you in the next tutorial! 🐢🪷
amigurumi turtle pattern, free crochet turtle, lily pad amigurumi, nature crochet pattern, crochet turtle tutorial, amigurumi pond animals, easy crochet turtle, handmade turtle gift